
Here’s how to share a Reel from Instagram to your Story on both Instagram and Facebook. This helps you reach more people and keep your followers interested.
Creating Reels can be a challenging task, as any content creator would tell you. Yet, with over 200 billion plays on Instagram and Facebook daily, Reels are among the most watched content on these platforms. Given their popularity, it would be unwise to invest time and resources into creating Reels without maximizing their reach.
To get the most out of these short videos, it’s essential to know how to share a Reel to your Story. Reels are fantastic for reaching new audiences, but Stories play a crucial role in reminding your followers of your presence and driving engagement. Sharing your meticulously crafted Reels to your Story is an excellent strategy to highlight your content and keep your audience engaged.
Is it Possible to Share a Reel to Your Story?
Got a Reel you like and want to share it with your friends? Well, the good news is: YES, you can do it.
Not only is it possible to share a Reel to your Story, but you can also do it across platforms. This means if you want to share an Instagram Reel on Facebook, or vice versa, it is completely doable.
Whether the Reel is one you have created or one of the many you encountered while scrolling through the Instagram algorithm, you can reshare it to your Story.
In this section, we will focus specifically on how to share Reels to your Story. Be it on Instagram or Facebook, you’ll learn the steps to extend the reach of your engaging content effectively.
Why Should You Share Reels as Stories?
Sharing Reels as Stories might seem like an extra step, but it’s actually a smart move for anyone looking to boost their social media presence. Here’s why:
1. Efficient Content Strategy
Staying consistent on social media can be tough. Sharing your Reels as Stories helps you keep your content pipeline full without constantly creating new material. It’s an efficient way to stay active and relevant.
2. Freshness and Variety
Sharing Reels from other creators can add variety to your feed. It breaks up the monotony of your own posts and keeps your audience engaged with fresh content. Plus, sharing others’ work shows you’re supportive of the community.
3. Amplifying User Content
For businesses, sharing Reels made by your customers is a great way to boost engagement and authenticity. User-generated content (UGC) is powerful, as people trust the opinions of their peers. Encourage your followers to create and share their own reels about your brand to further amplify the reach of this user-driven content, businesses strategically buy Insta followers as a way to enhance visibility, build social proof, and drive even greater engagement across their audience.
4. Balanced Content Mix
A healthy social media presence includes a mix of promotional and non-promotional content. Sharing Reels as Stories helps you maintain that balance, showing your audience that you’re not just about sales, but also about entertainment and value.
5. Enhanced Engagement
Stories often have higher engagement rates because they are more immediate and intimate. When you share a Reel to your Story, you increase the chances of your followers interacting with it, keeping them engaged with your profile.
6. Building Anticipation
Creators often share a snippet of their Reel in their Story to tease their audience. This tactic builds anticipation and curiosity, leading to more views and interactions when the full Reel is posted.
7. Direct Traffic with Links
While Reels don’t allow direct links, Stories do. If you’re promoting something specific, you can share your Reel as a Story and include a swipe-up link (for accounts with 10k+ followers) or a link sticker, driving traffic exactly where you want it.
Bonus: How to Find Trending Songs for Instagram Reels
How to Share A Reel to Your Story on Instagram?
As we said before, you can share not only your own Reels but also the Reels made by others. Sharing someone else’s Reels to your Story is one of the best parts of this feature.
Sharing an Instagram Reel to your Instagram Story is a straightforward process that allows you to highlight engaging content and increase its visibility. Here’s a step-by-step guide to help you seamlessly share Reels as Stories on Instagram:
- Navigate to Your Profile and Find the Reel: Open the Instagram app on your mobile device. Go to your profile and locate the Reel you want to share to your Story.
- Tap on the Share Icon: Beneath the Reel, you’ll find the paper plane icon, also known as the “Share” icon. Tap on it to proceed.
Image Source
- Select “Add to Story”: Among the options that appear, choose “Add to Story” located at the bottom of the screen. This action will generate a preview of your Reel as a Story.
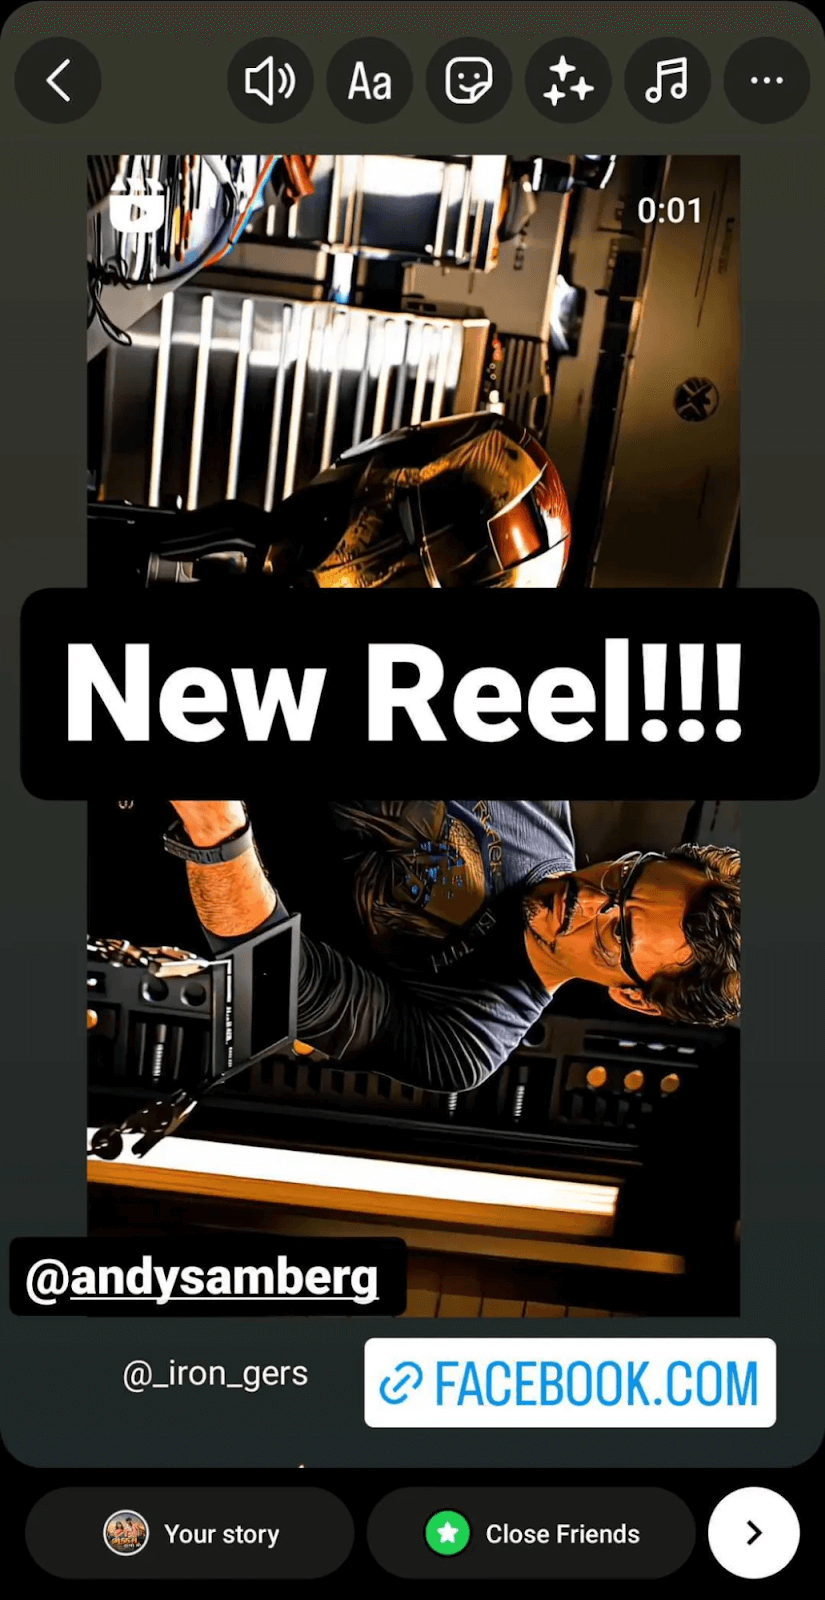
Image Source
4. Before sharing, you can customize your Story to make it more engaging. Add stickers, tags, mentions, countdowns, or any other creative elements to enhance your Story.
It’s good practice to credit the original creator if the Reel is not from your account. You can do this by keeping the name tag of the original creator visible in the corner of your Story, or by tagging them directly in your Story for better networking.
4. Add a Link (Optional): Instagram allows you to add links to Stories. You can direct your audience to the original Reel or any other landing page by adding a link. If you want to notify your followers about new content, you can add text like “Tap here” or “New Reel” directly on the Reel.
5. Share Your Story: Once you’ve customized your Story, click on “Your Story” at the bottom of the screen to share it with your followers.
Note: Remember that you can only share Reels from accounts that are public or have given permission to share their content publicly. This ensures that you respect the creator’s rights and Instagram’s community guidelines.
By following these steps, you can effectively share Instagram Reels to your Story, increasing engagement and interaction with your audience on the platform. Happy sharing!
How to Share a Facebook Reel to Instagram Story
Sharing your favorite Facebook Reels to your Instagram Story can be done in a few simple steps, ensuring your content reaches a wider audience across both platforms. Here’s how you can seamlessly cross post your Facebook Reel to Instagram Story:
Here is how you can easily share your Facebook Reel to Instagram:
- Go to the Account Center and choose “Sharing across profiles.”
- Under “Share from,” pick your Facebook account.
- Under “Share to,” choose the Instagram account you want to share with and turn on the switches next to the types of content you want to share automatically.
By using these methods, you can easily share your Facebook Reels on your Instagram Story. This helps more people see your content and keeps it interesting on both platforms. Try out these ideas to find the way that works best for your social media goals and keeps your audience interested.
Bonus: Instagram Quotes for Any Day
How to Share a Reel to Story Longer Than 15 Seconds
Reels on Instagram can be up to 90 seconds long, which exceeds the 15-second limit imposed by Instagram Stories. If you wish to share a Reel that exceeds this limit as a Story, you’ll need to follow these steps:
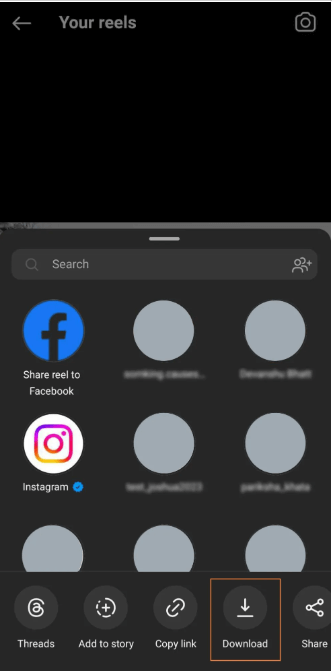
- Download the Reel: Start by downloading the Reel to your device. If it’s your own Reel, simply navigate to the Reel, tap on the Share button, and select the Download option. from the bottom menu. This will save the Reel to your device’s storage
- Adjust the Duration: To fit within the 15-second Story limit, you’ll need to trim the Reel. Use a video editing app or tool to cut the Reel into 15-second segments. Ensure each segment flows smoothly to maintain the integrity of your content.
- Remove Watermarks (Optional): The downloaded Reel will typically have an Instagram watermark and your username. If you prefer to remove these watermarks, you can use online Reel downloaders. These tools allow you to download Reels without any unwanted overlays, ensuring a clean presentation when shared as a Story.
- Upload to Instagram Story: Once you have your trimmed segments ready, open Instagram and create a new Story. Upload each 15-second segment in sequence to recreate the full Reel experience for your audience.
- Enhance with Story Features: Customize your Story with text, stickers, or other creative elements to engage your audience further. Instagram offers a range of tools to make your Stories more interactive and visually appealing.
- Post Your Story: After adding your finishing touches, tap “Your Story” to share the segmented Reel with your followers. This method allows you to leverage Instagram’s Story format while showcasing longer Reel content effectively.
By following these steps, you can maximize the impact of your longer Reels by sharing them seamlessly as engaging Stories on Instagram. This approach not only adheres to Instagram’s Story duration limits but also ensures your content remains captivating and accessible to your audience.
How to Share A Reel to Your Story on Facebook?
If automatic sharing isn’t enabled, you can’t directly share your Instagram Reel to your Facebook Story. Nevertheless, there are alternative methods to achieve this.
Method 1.
You have two options: download the Reel from Instagram (it will have a watermark) or utilize third-party Instagram Reel downloaders (without a watermark) to download Reels and post them as Facebook Stories. Always give credit to the original creator.
Method 2.
Another method to share an Instagram Reel to a Facebook Story involves initially sharing it on Instagram.
- Step 1: Navigate to the Reel you want to share and tap the Share button, then choose “Add to Story” from the bottom.
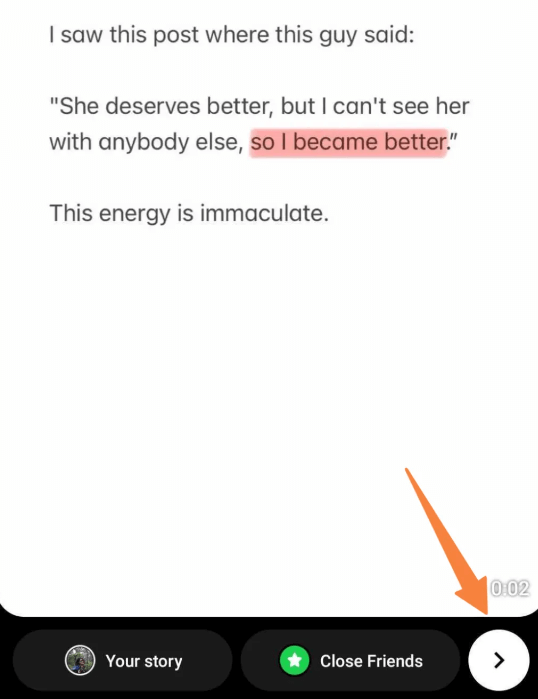
- Step 2: Click on the white button with the right arrow symbol in the bottom right corner of the screen.
Step 3: Now under the Your Story section go to the sharing options dropdown under. Select the Share Once option.
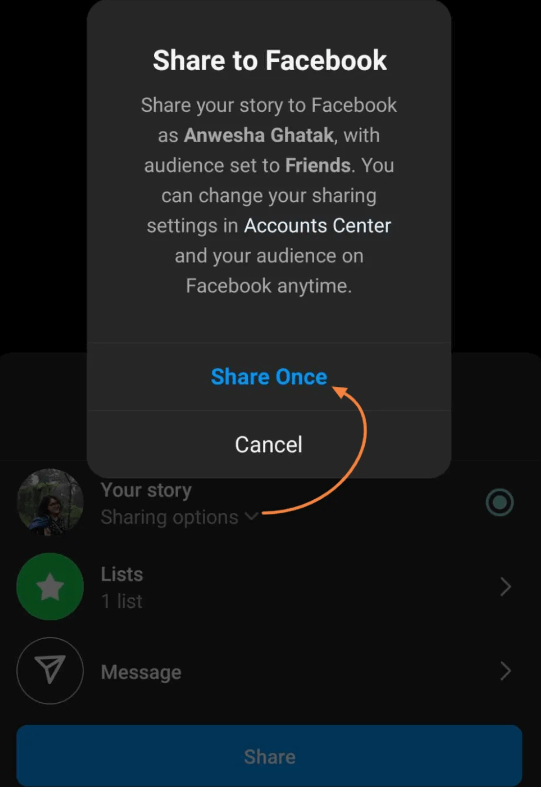
Step 4: Done. Just click on the blue Share button and you are good to go,
This way, your Instagram Reel will be Shared as a Facebook Story alongside an Instagram Story.
Method 3.
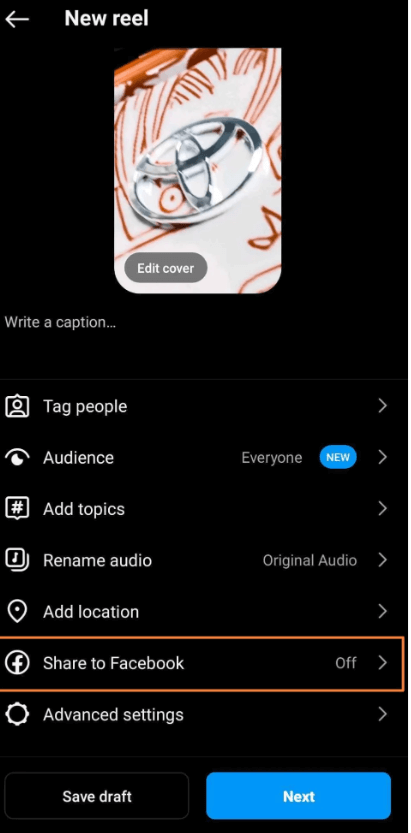
When you create a new Reel on Instagram, you’ll see an option to “Share to Facebook”.
If it is turned OFF, your Reel won’t be automatically shared on Facebook. If you switch the toggle to ON, your Instagram Reel will be published on Facebook as well.

If you switch the toggle to ON, Instagram will prompt you to decide whether to enable sharing for just this Reel or for all future Reels. Select the option you prefer. Once the Reel is on Facebook, you can share it to your Story just as you do on Instagram.
You can choose whichever option you prefer for sharing a Reel on Facebook. We hope this was easy to follow. If you want to automate the process and avoid the hassle of manual cross posting, we have a simple solution for you.
Automatically Share Content Across Facebook and Instagram
Meta (formerly Facebook) offers a convenient feature that allows users to automatically share content between their Instagram and Facebook profiles, provided they are connected. This feature simplifies the process of maintaining a consistent presence across both platforms without manual intervention for each post or Story.
Step 1: Ensure that your Instagram and Facebook profiles are connected.
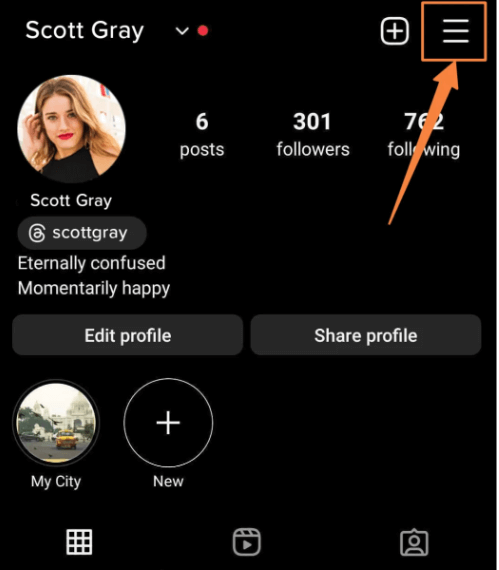
Step 2: Navigate to your Instagram profile and tap on the menu icon (hamburger icon.
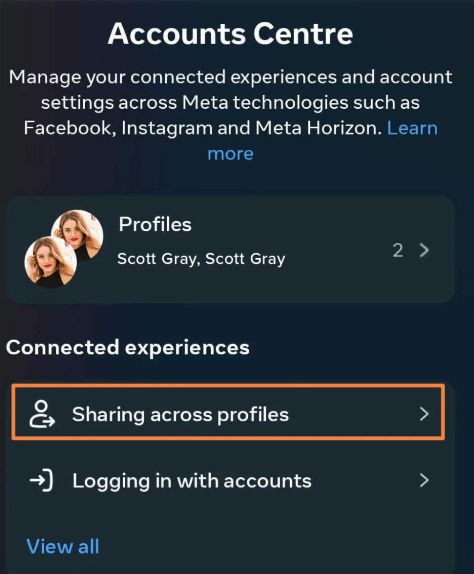
Step 3: In Settings, go to the Account Center and select “Sharing across profiles”
Step 4: Under “Share from,” select your Instagram account.
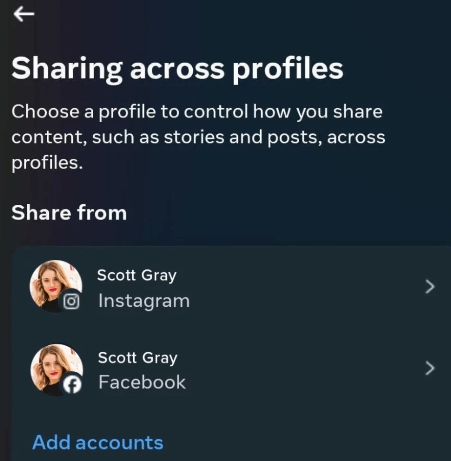
Step 5: Now, under “Share to,” select the Facebook account you want to share content with, and then enable the toggles next to the content types you want to automatically share.

This automation will ensure that all your Instagram content is simultaneously published on Facebook. You can follow the same steps in reverse to share content from Facebook to Instagram.
How to Schedule a Reel to Story
Scheduling your Reels to be shared as Stories can streamline your social media management and ensure consistent engagement with your audience.
Here’s a detailed guide on how to schedule a Reel to Story using Simplified, a powerful social media scheduler.
Using Simplified to Schedule a Reel to Story
Simplified simplifies the process of scheduling Reels to be shared as Stories on both Instagram and Facebook. Follow these steps to schedule your Reel:
- Download or Create Your Reel: Begin by preparing your Reel content. You can either download it from the source or create new content directly within Simplified.
- Log into Simplified: Access your Simplified account and navigate to the dashboard.
- Create a New Post: Click on the “Create Post” tab within Simplified.
- Select Platform-Specific Tab: Choose the platform tab where you want to schedule your Story (Facebook or Instagram).
- Choose Post Type as Story: Toggle the option at the top of the description field to select “Story” as your post type.
- Add Your Content: Use the “Add Media” button to upload your Reel content. You can upload videos from your device or link cloud storage accounts like Google Drive, Dropbox, or Box.
- Select Accounts: Choose the specific Instagram and Facebook accounts where you want to share the Reel as a Story. You can select multiple accounts if needed.
- Set Scheduling Options: Decide when you want your Story to be published. You can choose to publish it immediately, at a specific date and time, or set it to repeat on a schedule.
- Review and Schedule: Double-check all details, including content, accounts selected, and scheduling options. Once everything looks good, schedule your Reel to be shared as a Story.
Benefits of Using Simplified for Scheduling Reels
- Centralized Dashboard: Manage all your social media publishing needs from one user-friendly dashboard, ensuring efficiency and ease of use.
- Customization: Tailor your posts for each platform within Simplified, optimizing content for Instagram Stories and Facebook Stories effortlessly.
- Automation: Schedule your Reels in advance, reducing manual posting efforts and ensuring consistent visibility.
By leveraging Simplified capabilities, you can effectively schedule and manage your Reels as Stories across Instagram and Facebook, enhancing your social media strategy with streamlined automation. Start maximizing your content’s reach and engagement today with Simplified!
That’s a Wrap!
Understanding the role of different types of content—whether it’s posts, Stories, Reels, or carousels—is crucial for crafting an effective social media marketing strategy. Each type serves a unique purpose in engaging your audience and expanding your reach.
Reels and Stories, in particular, play a pivotal role in maintaining the excitement of your current followers while also attracting new ones to join your community. By leveraging these features effectively, you can create dynamic content that resonates with your audience and encourages interaction.
To simplify your social media management and maximize your content’s impact across platforms and account and fuel your business growth by using Instagram Reels scheduler
With its free trial, you can seamlessly manage and schedule your posts, ensuring they reach your audience at optimal times. So, embrace cross-posting and streamline your social media efforts with tools that bring all your content under one organized umbrella. Start your journey with Simplified and discover how easy it can be to elevate your social media presence.


 and What to Avoid")
")

")


