Being organized is not always easy – it’s a skill that comes with consistent practice. However, it is one of the many essential ingredients for a successful workspace. Thoughtful organization improves efficiency, reduces distractions, and enables you to work on project designs productively. As a graphic designer, maintaining a clean workstation can free your mind from outside constraints, allowing you to unleash your imagination. Thanks to digital design workspaces such as Simplified, you can keep everything you need at your fingertips.
Want to explore how you can simplify your designing process with an organization hack?
Getting Started
On Simplified, you can explore user-friendly designing tools even if you don’t have prior experience in design! You can start your journey to a stunning design project by signing in to your profile on our website.
If you are a new user, sign up using your email, or instead, you can hit ‘Continue with Google’.
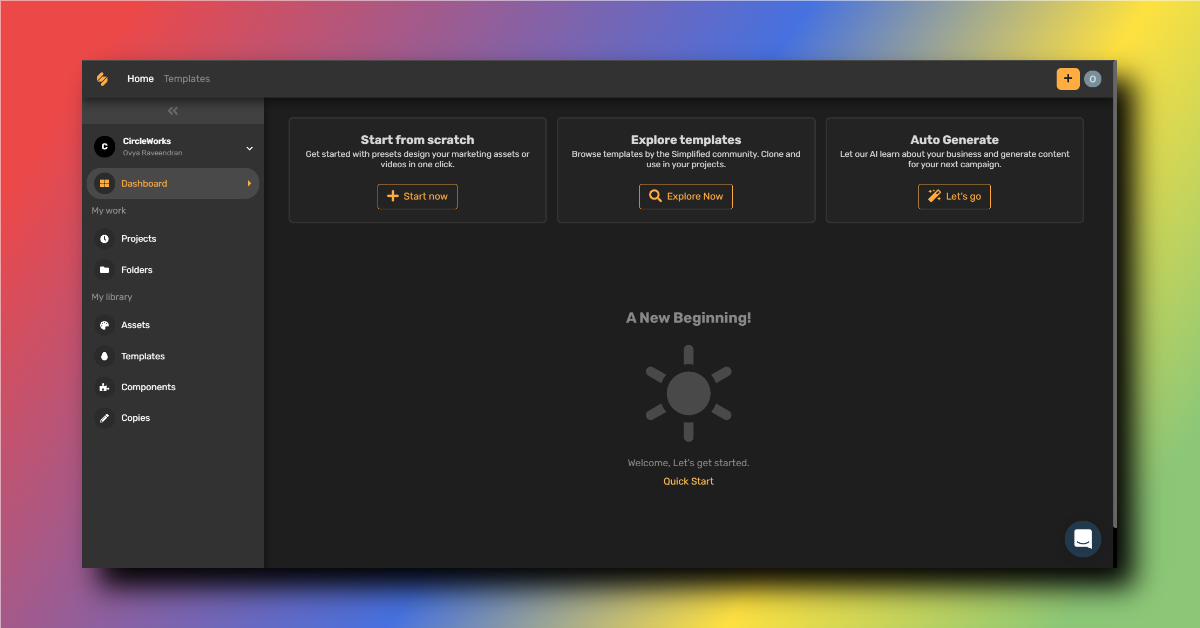
On the dashboard, you’ll find all the resources you need to become a great designer! And if you’re looking for preset designs, say no more! On Simplified, you’ll have access to an entire library of templates. This gives you the flexibility to choose from a diverse set of preconfigured interfaces to kick-start your design project.
Select any one of the 3 options to work on your dashboard. You can:
- Use a template – Easy, ready-to-use and all-inclusive designs that save time!
- Start from scratch – Start crafting your own unique vision on a blank canvas.
- Auto Generate – Personalized AI generated content for your brand!
Source: Simplified.com
Simplified Tip: Want to collaborate on a design with your teammates? It’s simple, create a shared workplace so everyone can access the project designs! Go to Settings > My Workplace > Update Workspace Name > Invite Member > Send Invitation!
After you select the desired dimensions of your project, start exploring the wide range of tools available. On Simplified, project design files can be divided and filed easily, making it a hassle-free process. Next, we’ll tell you how to start uploading media to begin designing!
Uploading Media In 2 Simple Steps
Uploading media is a significant step in designing that allows you to have everything you need handy. Here’s how to do it in just two simple step
- Step 1: On the side panel click on ‘Assets’.
- Step 2: Click on ‘Upload’. Now you can select images, videos as well as gifs to your assets!
Check out the video below to see how to upload your design project files efficiently!
Bonus: 7 Common Graphic Design Mistakes By Beginners & Ways To Avoid Them!
Managing Assets: Create A Project Design Folder
A good designer must always keep their workspace organized, especially when working on multiple projects. By creating folders, you will save time looking for assets and will have more time to work on your designs. Win-win!
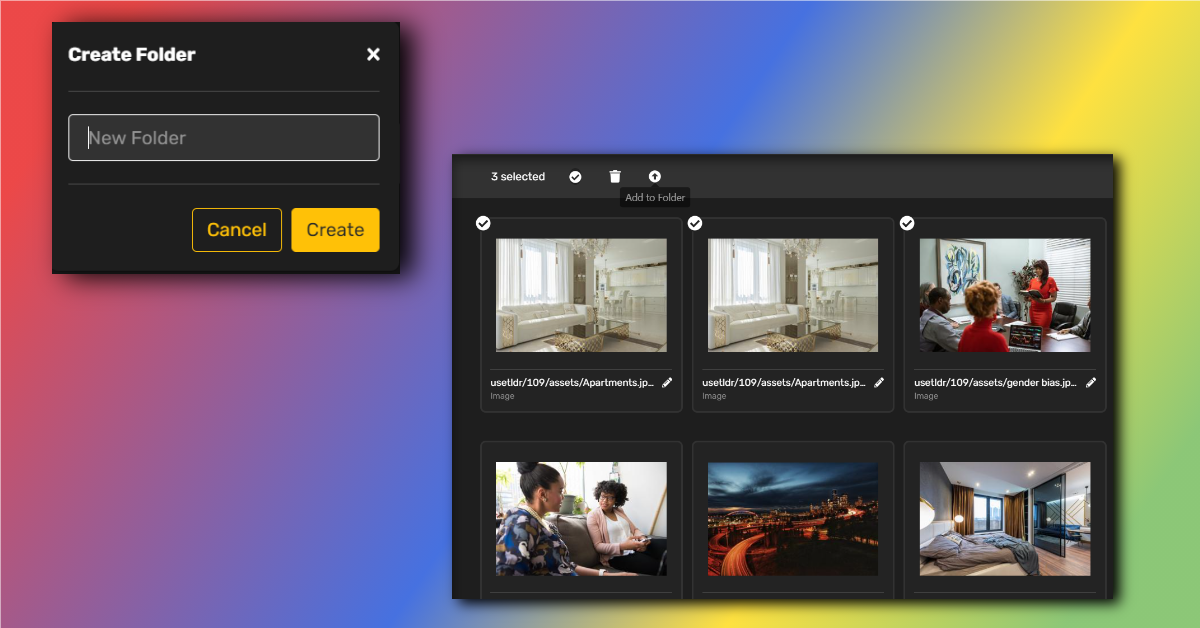
You can manage the assets you’ve uploaded on our website in 5 simple steps:
- Step 1: On your dashboard, click on ‘My Library’.
- Step 2: Click on ‘Folders’.
- Step 3: Now, click on ‘Create a Folder’ and add a suitable name for it.
- Step 4: Go back to ‘My Library’ and select ‘Assets’.
- Step 5: To add your assets to a folder, click on the top left corner of the media file. This will select your asset. Now you can add it to the desired folder!
Source: simplified.com
Check out the video below for a quick reference on creating project design folders!
See also: Your Simplified Guide To A Minimalist Web Design
There you have it, design project management, Simplified. So get organized, unleash your creativity, and create a design now!


![10 Best AI Image Restoration Tools to Try in 2025 [Free & Paid] 10 Best AI Image Restoration Tools to Try in 2025 [Free & Paid]](https://siteimages.simplified.com/blog/Best-AI-Image-Restoration-Tools-01.png?auto=compress&fit=crop&fm=png&h=400&w=400)
![How to Use Photoshop AI Generative Fill Feature [2025] How to Use Photoshop AI Generative Fill Feature [2025]](https://siteimages.simplified.com/blog/How-to-Use-Photoshop-AI-Generative-Fill-01-1.png?auto=compress&fit=crop&fm=png&h=400&w=400)
![20 Podcast Thumbnail Ideas to Boost Your Show’s Visual Appeal + Best Practices [2025] 20 Podcast Thumbnail Ideas to Boost Your Show’s Visual Appeal + Best Practices [2025]](https://siteimages.simplified.com/blog/Podcast-Thumbnail-Ideas-to-Boost-Your-Show-02-1.png?auto=compress&fit=crop&fm=png&h=400&w=400)
