
Alright, if you’re anything like me, you know how confusing it can get just figuring out the right video format for each social platform. I swear, some days it feels like you need a degree in video wizardry to keep up. But really, once you get the hang of TikTok, Instagram, and YouTube’s video preferences, creating content becomes less of a headache. So let’s break it down together—bite-sized, no fancy jargon.
File Formats Demystified: MP4, MOV, and More
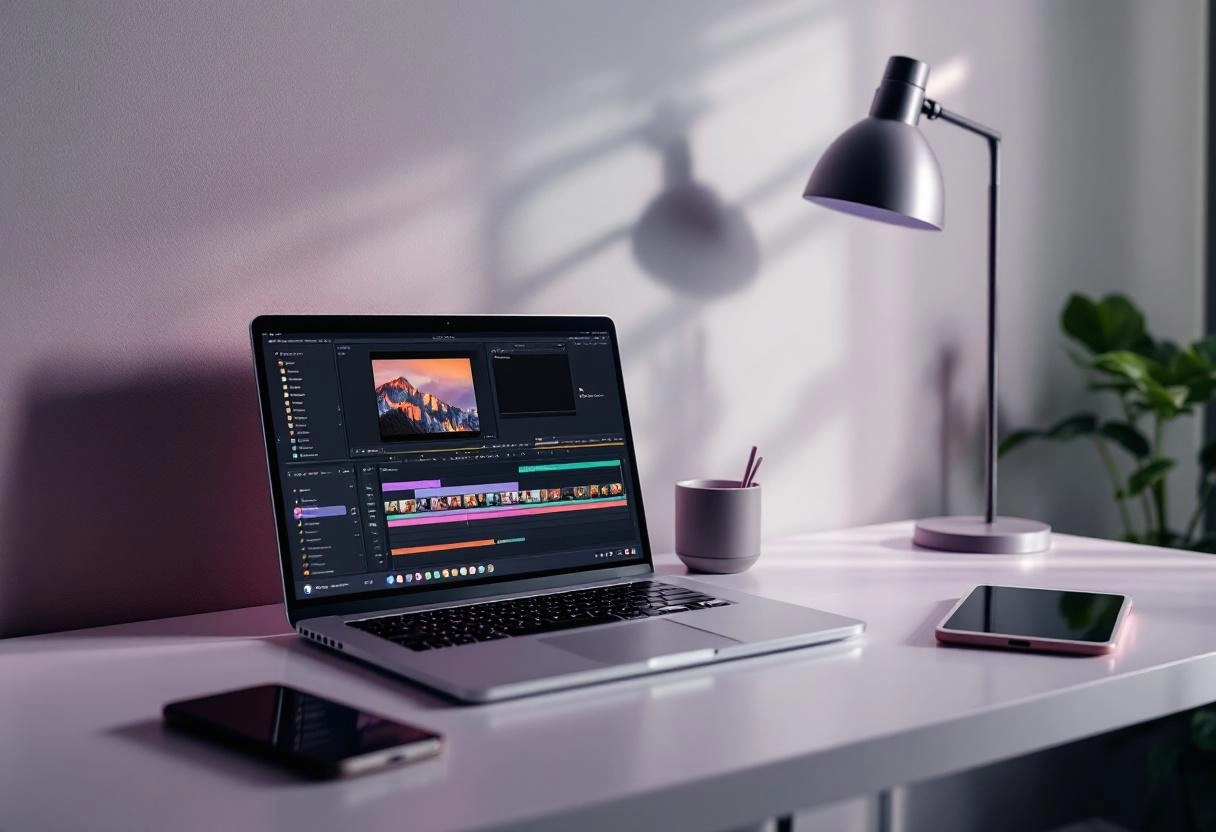
You know, when I first started fiddling around with video files, the whole world of file formats felt like this chaotic maze. MP4 here, MOV there, codecs mumbling something in the background—and honestly, who has time to decode that kind of tech jargon? But after a few frustrating moments (and a few lost hours), I realized that understanding the basics can actually save a lot of headache.
So, let’s unpack these file formats like we’re chatting over coffee—no techie speak, just the essentials that’ll help you pick the right format without second-guessing yourself.
MP4: The Universal Language of Video
MP4 is like that comfortable pair of jeans you find in your closet—fits almost everything, everywhere. Seriously, MP4 (or MPEG-4 Part 14, to get fancy) has become the go-to format because it balances quality and file size perfectly. Whether you’re uploading to YouTube, sending videos via email, or just storing memories on your phone, MP4 usually has your back.
From my own experience, it’s incredibly rare to run into a device or platform that won’t play an MP4 file straight away. Even most smart TVs and gaming consoles speak this “language.” What’s interesting (and I love geeky tidbits like this) is how MP4 efficiently compresses video and audio, so your videos don’t hog gigabytes but still look crisp enough on a 55-inch screen.
Of course, there are times when MP4 isn’t the best choice, but honestly, they’re pretty rare unless you’re doing some high-end editing or professional film work.
MOV: Apple’s Preferred Format (and When to Use It)
Now, MOV feels like the posh cousin in this family. Created by Apple, it’s the default in QuickTime and favored by many Mac users and creative pros. I remember editing a project on my old MacBook, and the MOV files just felt smoother when importing into Final Cut Pro.
MOV files tend to preserve quality better than MP4, but here’s the catch—they can be much bigger in size. So, if you’re working on a video project that you plan to edit extensively or want the best quality without worrying about file size, MOV is your buddy.
But—and this is a big but—if you try to play MOV files on non-Apple devices, you might run into compatibility issues. It’s like trying to use an Apple charger with a slightly older Android phone—not impossible, but fiddly.
Other Formats: When to Venture Beyond the Basics
Okay, now for the wildcard formats that sneak into conversations if you hang out in video editing circles long enough. Ever heard of AVI, MKV, or WMV?
Here’s the thing—most people don’t need to touch these unless:
- You’re dealing with super high-resolution content like 4K or 8K videos for professional films or presentations.
- You want ultra-customizable options, such as multiple audio tracks or subtitles embedded (think MKV).
- Compatibility with rare or older software.
Personally, I once had to convert a bunch of AVI files from an old camcorder to MP4 just so I could edit smoothly on my laptop without crashes (that sinking feeling when your software freezes mid-edit? Yeah, not fun.).
So, if you’re just capturing memories or making quick videos for social media, sticking with MP4 or MOV usually avoids unnecessary complexity. But if you’re heading into the wild west of video production, knowing about the alternatives can be a lifesaver.
In the end, it’s all about what you need. Quality or size? Editing flexibility or playback ease? The right format can feel like a secret handshake, but it really boils down to the project in your hands.
Bonus: How to Remove Sound from MP4 Video: Free Tools and Tips
How to Convert Videos for TikTok, Instagram, and YouTube: Step-by-Step Guide
You know, conversion tasks can sometimes feel like walking through a maze with blindfolds on—especially when you’re switching between different platforms or file types. But honestly, with the right mindset and approach, it’s more like following a well-lit path. So, let’s dive in and unpack those, shall we?
Here’s how to convert your videos step by step:
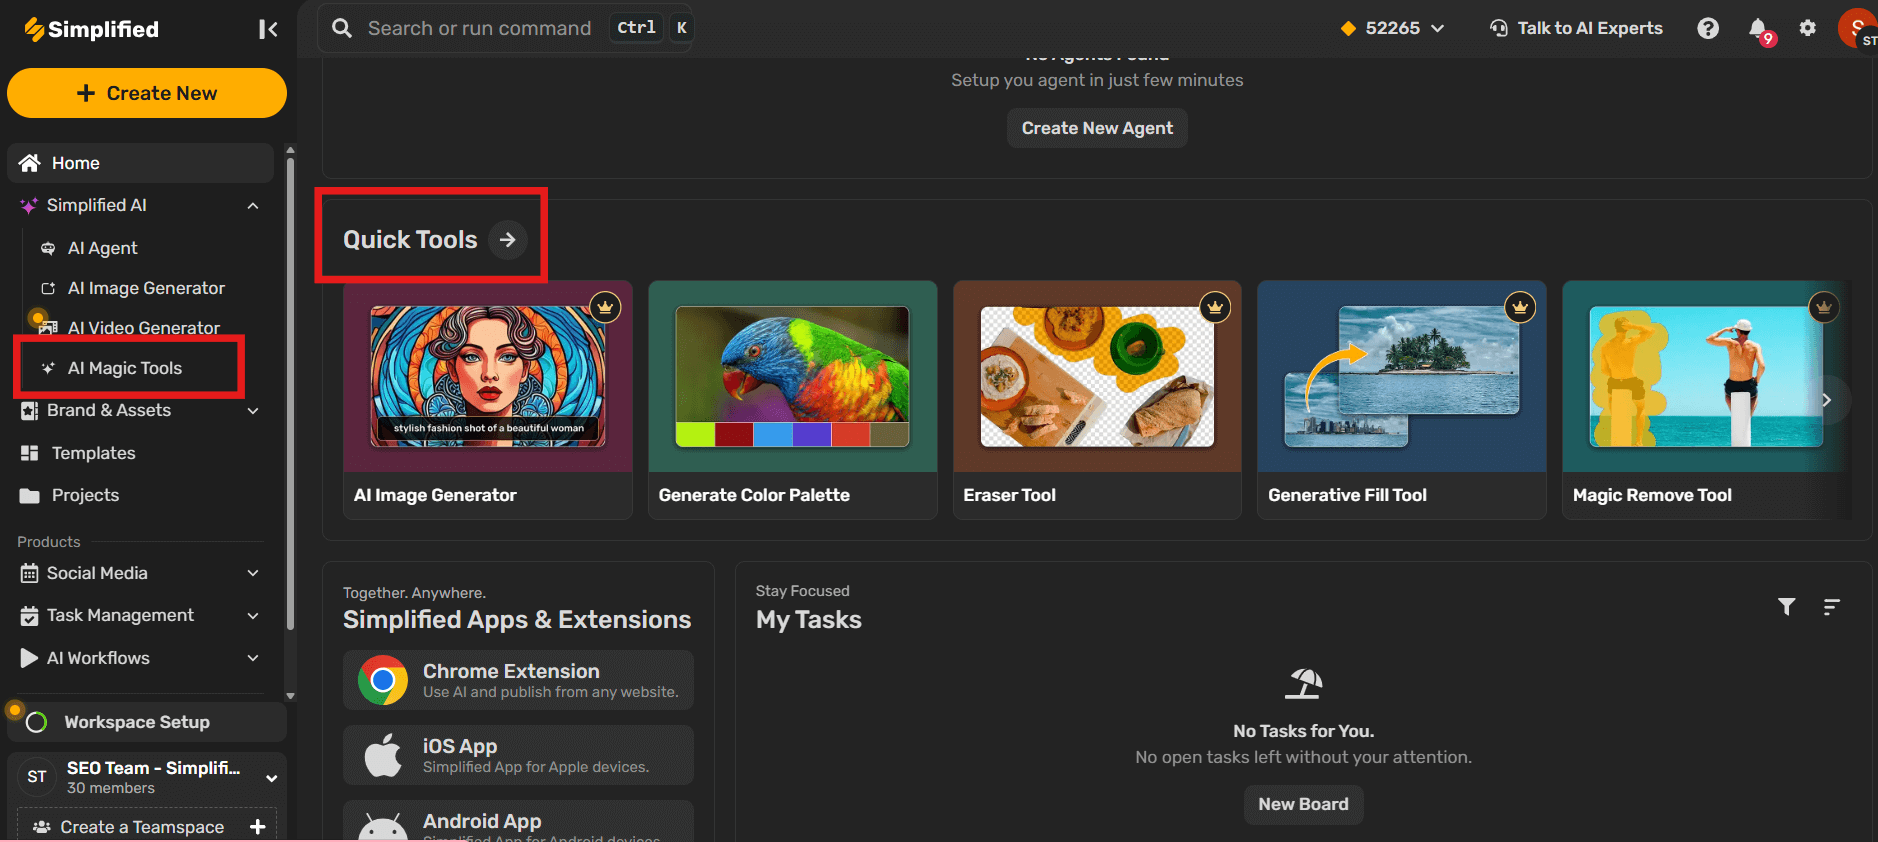
Step 1: Log in and Head to the Convert Video Tool
Once you’re in your Simplified account, go to the “AI Magic Tools” or just click on “Quick Tools.”
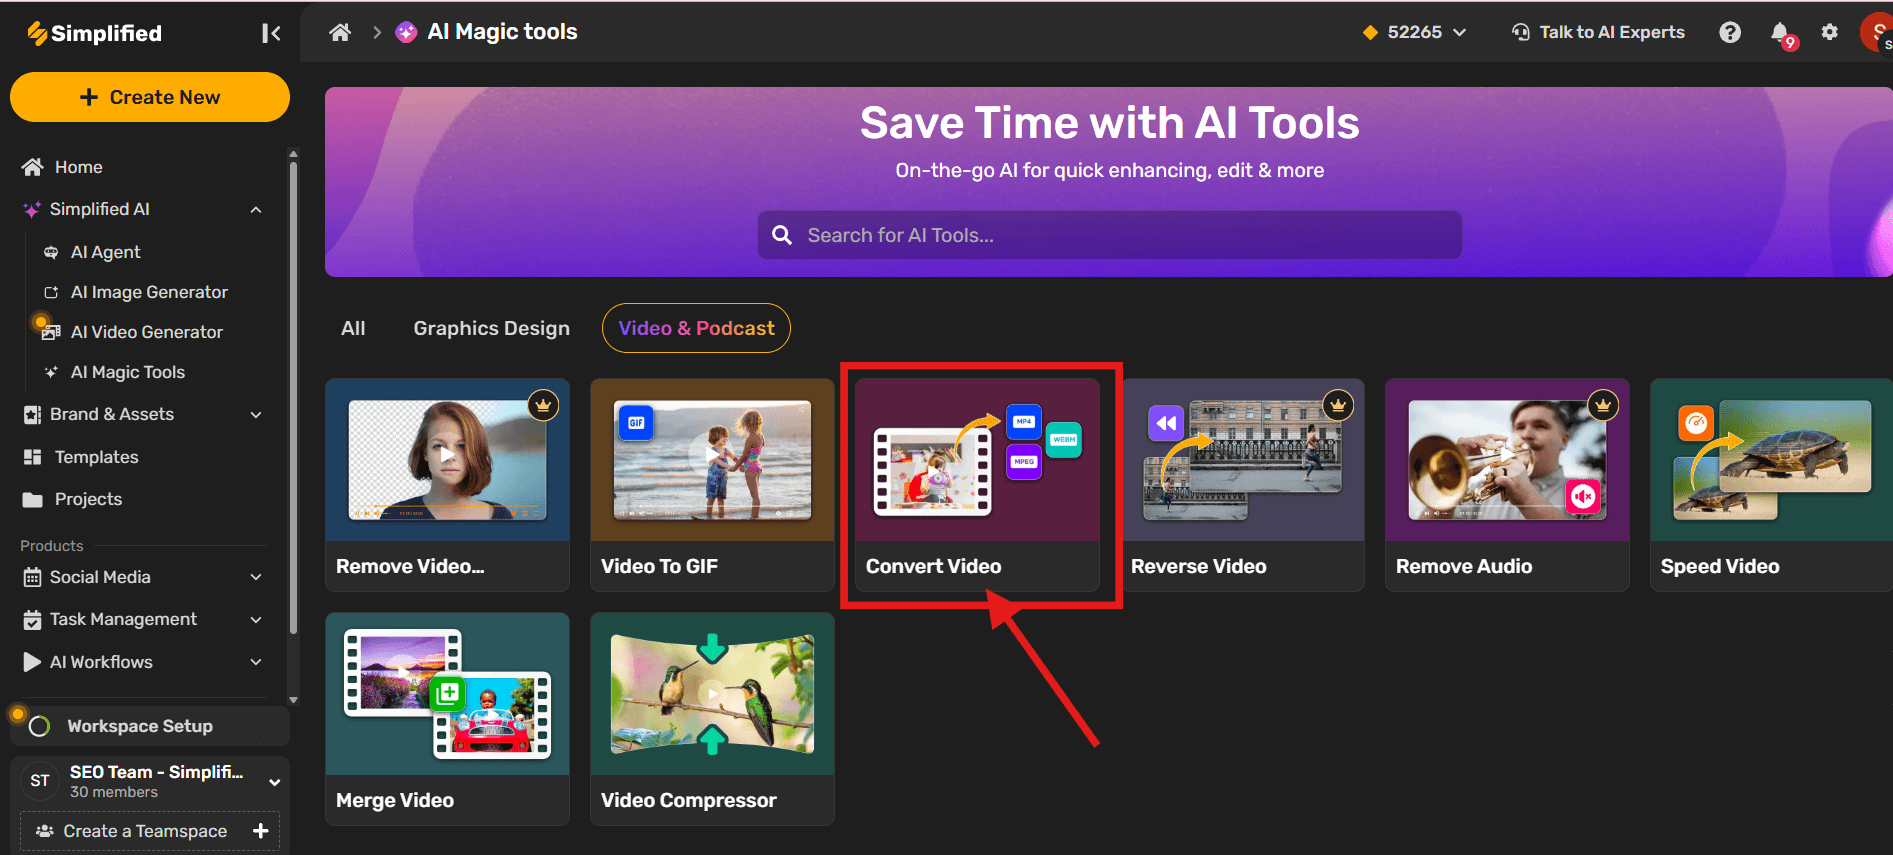
From there, choose “Video & Podcast,”
and then select “Convert Video.”
Step 2: Upload Your Video File
Upload the video you want to convert.
Just make sure your file is in one of these supported formats:
.mp4, .m4v, .mkv, .mov, .webm, .ogg, .avi, .mpeg, .flv, .wmv
(Quick tip: .mp4 works best across TikTok, Instagram, and YouTube!)
Step 3: Choose the Output Format
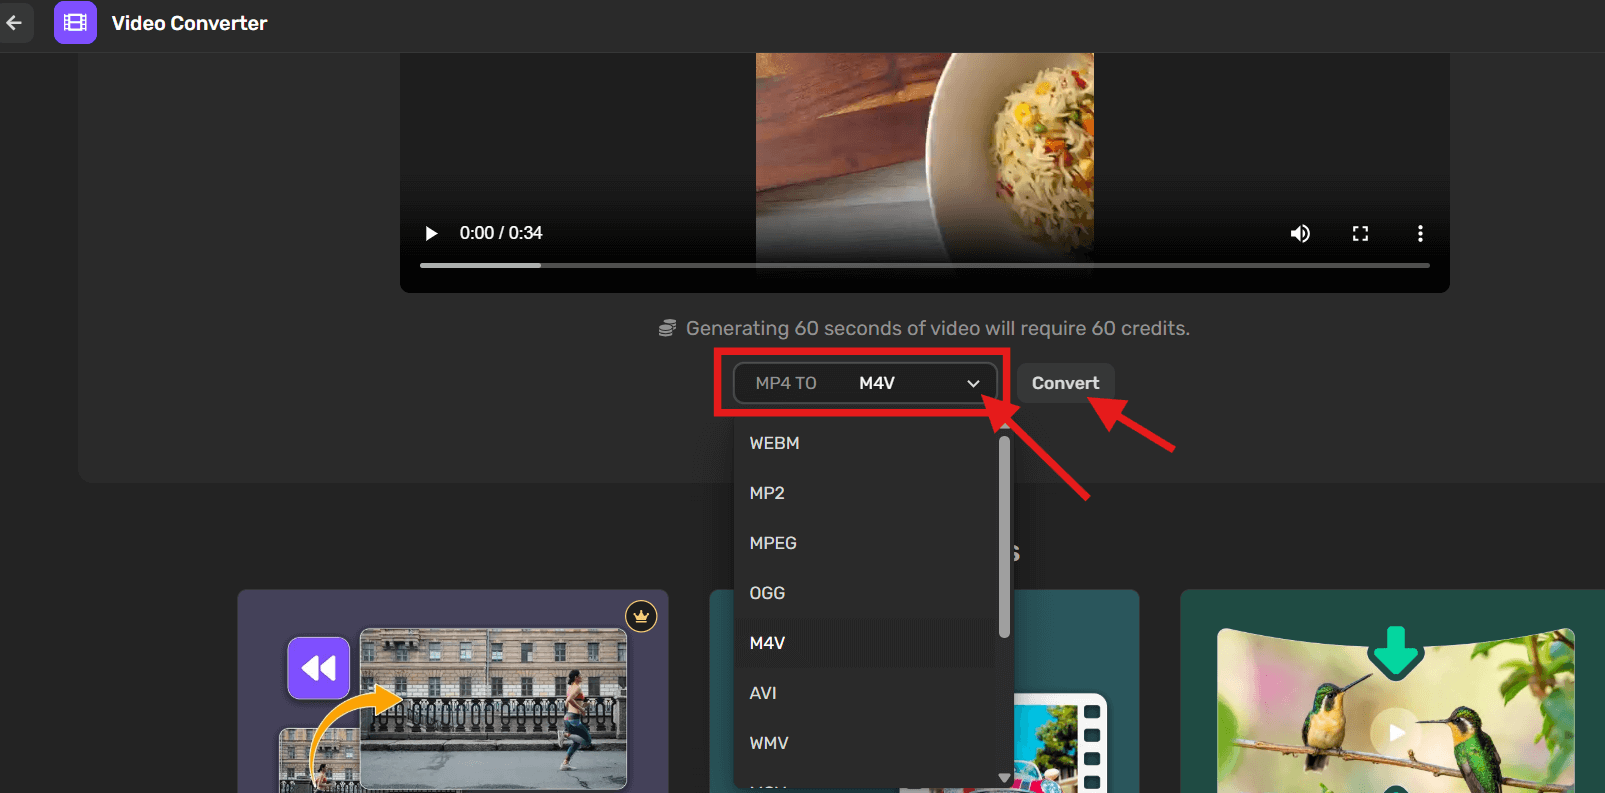
Pick the format you need based on where you’re posting—YouTube, TikTok, or Instagram. Select the one that fits and hit “Convert.”
Here’s a quick breakdown of supported file formats:
- Instagram supports:
.mp4,.mov - TikTok supports:
.mp4,.mov,.webm - YouTube supports:
.mp4,.mov,.avi,.mpeg,.wmv,.flv,.3gpp
Choose wisely depending on where your audience is—and what kind of device they’ll be watching from. Then let the AI handle the rest.
Step 4: Download Your Converted Video
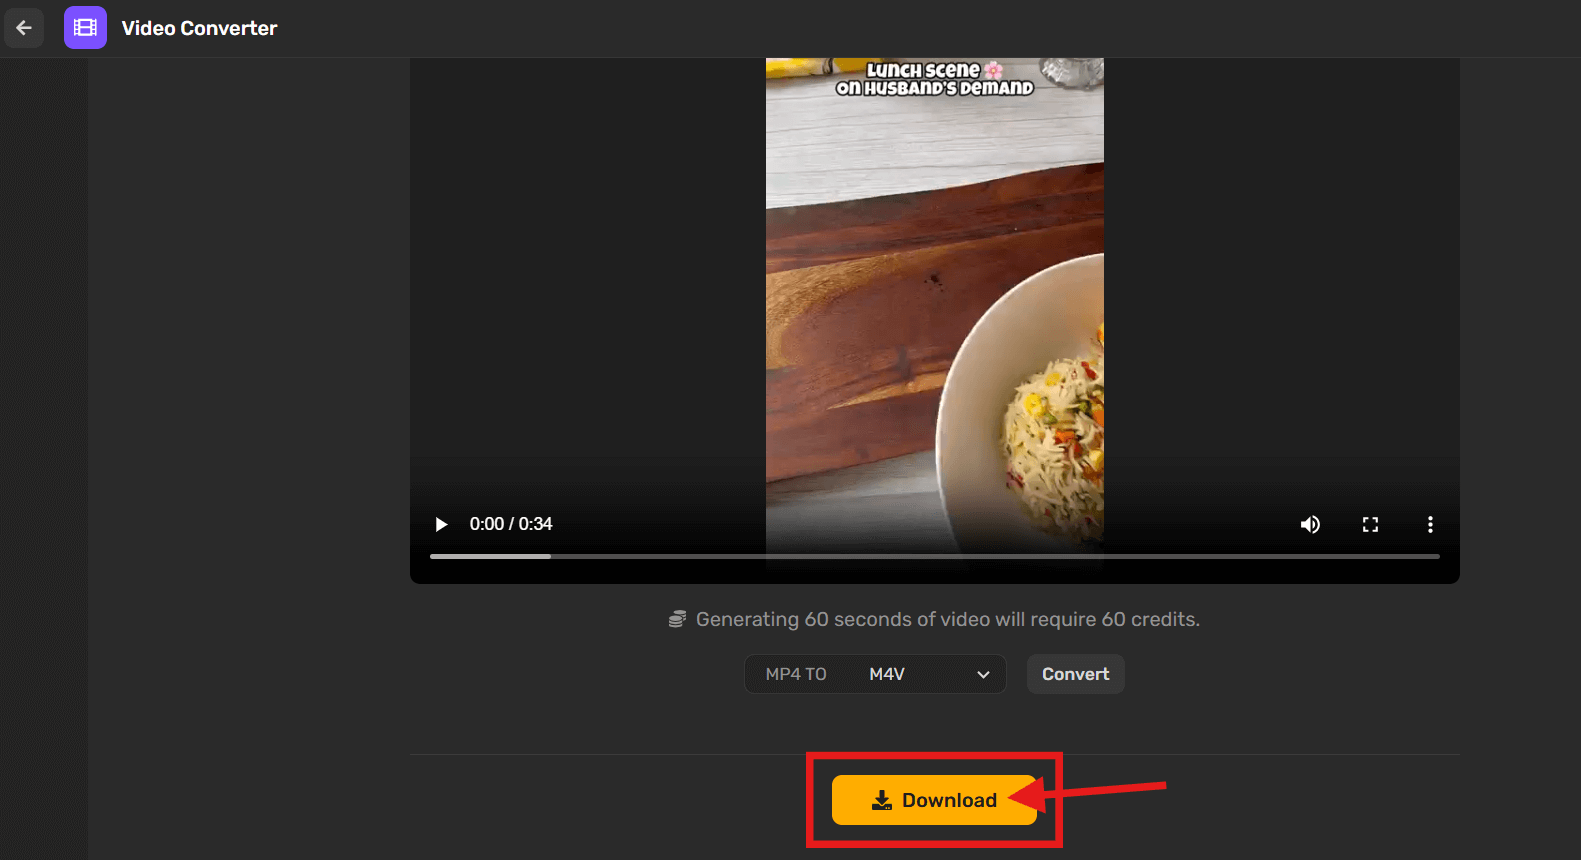
Once the conversion’s done, just download it. No watermarks, no waiting game. Your content’s ready to post.
Bonus: How to convert videos into GIFs?
Tools of the Trade: Free Video Converters
1. Simplified
- Type: Online content and video tool suite
- Standout Feature: Convert video into MP4, AVI, MOV, MKV, WMV, FLV, WMV, WebM, MPEG and more. Integrated video converter within a full creative platform—compress, resize, edit, subtitle, and schedule social posts right from your browser. No watermark in the free version.
- Best For: Creators and teams looking to convert and prep videos quickly without switching tools or installations.
2. FreeConvert
- Highlights: Secure uploads (with encryption), adjustable video bitrate, resolution, and container format. Free plan includes basic conversions up to 1 GB; paid unlocks batch processing and removes limits.
- Best For: Users who need flexibility across file types and granular control over output settings.
3. VideoConverter.com
- Details: Offers support for MP4, AVI, MPEG, MOV, FLV, 3GP, WEBM, WMV, etc. Free tier includes 5 tasks per day (with faster conversions and more formats in paid tiers).
- Best For: Casual users needing quick conversions without registration or complex interfaces.
4. Freemake
- Key Capabilities: Supports over 500 formats. Allows basic editing like trimming, rotating, merging, DVD burning, and direct upload to YouTube. Free version includes watermarks and unwanted bundled adware.
- Best For: Windows users needing offline conversion and light editing—though expect limitations unless you upgrade.
5. VEED.IO
- Why It Stands Out: Converts MP4, MOV, AVI, MKV, WMV, FLV, WMV, WebM, MPEG and more. Offers drag‑and‑drop ease, editing features (subtitles, filters), and exports directly—free with some limitations.
Best For: Creators and marketers who want conversion and basic editing in one user‑friendly interface.
TikTok’s Video Vitals: Short, Sweet, and Vertical
TikTok lives for quick, punchy vibes and mostly vertical videos. Honestly, it’s like the snack aisle of the internet—everything is fast, fun, and made for instant consumption. While you can technically upload videos up to 10 minutes now, I’ve found (and the platform’s design supports) that 15 to 60 seconds is the sweet spot.
And here’s the kicker: TikTok really prefers vertical video at 1080 x 1920 pixels. Trust me, when I tried uploading a landscape clip, it just felt off, like wearing socks with sandals—technically fine, but awkward. The app’s full-screen layout demands that tall format to keep your audience glued.
Instagram’s Image: Stories, Reels, and In-Feed Videos
Instagram is kind of like a social chameleon—it changes depending on what content you’re putting out. So, let’s take it one at a time:
- Stories:These disappear within 24 hours, so they’re perfect for spontaneous, raw moments. The recommended size? Same vertical setup as TikTok — 1080 x 1920 pixels. I personally like to shoot them in portrait mode without worrying too much about perfection since they’re fleeting.
- Reels:These little gems are Instagram’s answer to TikTok’s short video explosion. Also vertical, also 1080 x 1920 pixels, with a time limit of up to 90 seconds. I’ve noticed Reels tend to perform better if they grab attention in the first 3 seconds—something I keep reminding myself every time I’m editing late at night.
- In-Feed Videos:Now here’s where Instagram gets a bit flexible—square (1080 x 1080), portrait, or landscape videos all work. But if you want that scrolling thumb to stop, I’ve found square videos hit that sweet spot visually, probably because they take up more real estate on the feed.
Fun fact: I once posted a wide landscape video in-feed, and it looked a bit lost in the crowd. Lesson learned, stick with square or vertical to keep that visual punch.
YouTube’s Realm: From Shorts to Long-Form Content
YouTube is like the giant library of the internet’s video world. You name it—short clips, tutorial marathons, music videos—you’ll find it. It’s less about just specs and more about format and length diversity. But specs still matter, so here’s the lowdown:
- YouTube Shorts:A relatively new player inspired by TikTok’s success, these are vertical videos limited to 60 seconds. Specs? Again, 1080 x 1920 pixels. I’ve enjoyed creating Shorts because they’re quick to make but pack a punch if you nail the hook.
- Regular YouTube Videos:Here’s where it opens up—traditional videos are typically horizontal, with the standard 1920 x 1080 pixels (Full HD). But, depending on your audience, 4K (3840 x 2160 pixels) is becoming more common, especially for cinematic or professional content.
- Long-form Content:This is where I sometimes get caught up. Uploading 20-, 30-, or even 60-minute videos means paying extra attention to resolution and bitrate to avoid pixelation or buffering issues. YouTube recommends keeping frame rates steady—usually 24, 25, or 30 fps for smooth playback.
Honestly, I remember my first upload in 4K—it was a tech review video back in 2020, and the crisp quality still gives me a little boost of pride whenever I watch it. But also, it made me realize how much data and patience it takes for folks on slower connections to watch—something I’m always mindful of now.
So, in a nutshell, knowing the specs isn’t just about technical boxes to tick—it’s about understanding how your content fits the vibe and flow of each platform. The crisp morning air of creating videos can be refreshing once you get past the “what size goes where” confusion.
Key Video Conversion Factors: Resolution, Aspect Ratio, and Frame Rate
You know, when I first started dabbling in video editing, these three terms—resolution, aspect ratio, and frame rate—felt like jargon thrown at me all at once. It was honestly overwhelming. But actually getting to know them changed the whole game for me, especially when I realized how much they influence not just the quality, but also how viewers experience a video. Let’s unpack each one, shall we?
Resolution Explained: Finding the Sweet Spot for Clarity
Resolution is basically how many pixels your video contains. Think of it like the number of tiny dots that make up the picture—more dots usually means a clearer image. But here’s the thing: higher isn’t always better. For example, 1080p (that’s 1920 by 1080 pixels) has become this comfortable go-to because it strikes a nice balance between sharpness and manageable file size.
So, if you’re creating content primarily for Instagram or Facebook, 1080p is often plenty crisp enough. However, for YouTube or projects where you want that cinematic feel, bumping it up to 4K can really wow your audience. Just don’t forget—you’ll need the right hardware and bandwidth to handle it smoothly.
Aspect Ratio: Why 9:16 Isn’t Just for TikTok
Ok, aspect ratio might have seemed trivial at first, but actually, it’s a game-changer, especially with all these vertical videos everywhere. You probably know the classic 16:9 widescreen—perfect for YouTube or most TV screens. But vertical video, the 9:16 ratio, has exploded thanks to TikTok and Instagram Stories.
I’ll admit, I was skeptical about vertical videos at first—coming from a more traditional mindset—but then I noticed how immersive they felt on a phone. It’s like the video fills the entire screen, no awkward black bars—kind of like when you pull your coat tighter on a chilly day, it just fits better.
But here’s a little tip: don’t just follow trends blindly. If your audience hangs mostly on desktop or widescreen devices, a horizontal video still reigns supreme. I’ve even seen creators switch back and forth depending on their campaign—a flexibility that pays off in my experience.
Frame Rate: Smooth Motion vs. File Size Savings
Frame rate is how many images per second your video shows. The common ones you’ll hear about are 24, 30, and 60 frames per second (fps). Well, 24fps is that classic “film look” — it’s a bit dreamy, kind of like watching an old favorite movie on a rainy afternoon. But bump it up to 60fps, and you get this ultra-smooth motion that’s great for fast action or gaming clips.
Here’s the catch though: higher frame rates mean bigger files and more processing power needed. I remember editing a GoPro clip at 60fps once, and it slowed my whole workflow to a crawl. So sometimes, it’s about what’s practical, not just what’s technically possible.
In short, I usually recommend 30fps as a solid middle ground — decent motion smoothness without overwhelming your system or your audience’s data plan. But hey, if you want to capture that silky slow-motion, then 60fps is your friend.
Final Thoughts: Format Fear? Not Anymore.
At the end of the day, video formats, conversion tools, and platform specs don’t have to be this intimidating wall of tech-speak. If you’ve made it this far, then hey—give yourself some credit. You’ve cracked open the once-mystifying world of .mp4s, frame rates, aspect ratios, and platform preferences like a pro.
Whether you’re editing your next viral TikTok, prepping a cinematic YouTube upload, or making Reels that pop, the right tools and know-how can make a world of difference. And once you find your groove—using something as seamless as Simplified or knowing exactly why MP4 works 9 out of 10 times—everything else becomes just part of your creative rhythm.
So no, you don’t need to be a filmmaker or technical person to get this right. You just need a little clarity, the right converter, and the willingness to experiment. Create boldly, convert wisely, and let your content shine wherever it lands.


")


