
You’ve probably seen a video where someone jumps into a pool, but in reverse, it looks like they fly out of it. Or someone drops their coffee, and suddenly it leaps back into their hand like magic. These reverse clips are everywhere on Reels, Shorts, and TikTok—and for good reason.
They grab attention fast. There’s something oddly satisfying about watching a moment play out backwards. It doesn’t need special effects or big production—just a fresh way to present something simple. If you’re making short-form content, adding a reverse video now and then keeps your feed interesting and keeps people watching.
Why Reverse Videos Do So Well on Social Media
People scroll quickly. You have maybe two seconds to make them stop. That’s where reverse videos help. They flip expectations—literally.
Say you post a video of you popping a balloon. Now play it backward, and suddenly it looks like the balloon inflates out of thin air. It’s unexpected. That kind of surprise makes viewers pause or rewatch. And the more they watch, the better your content tends to perform.
Creators often use reverse clips to mix up transitions, add humor, or just make a moment feel a bit more interesting. It’s a low-effort trick that adds variety without making your videos feel repetitive.
How to Reverse a Video in just 3 Simple Step
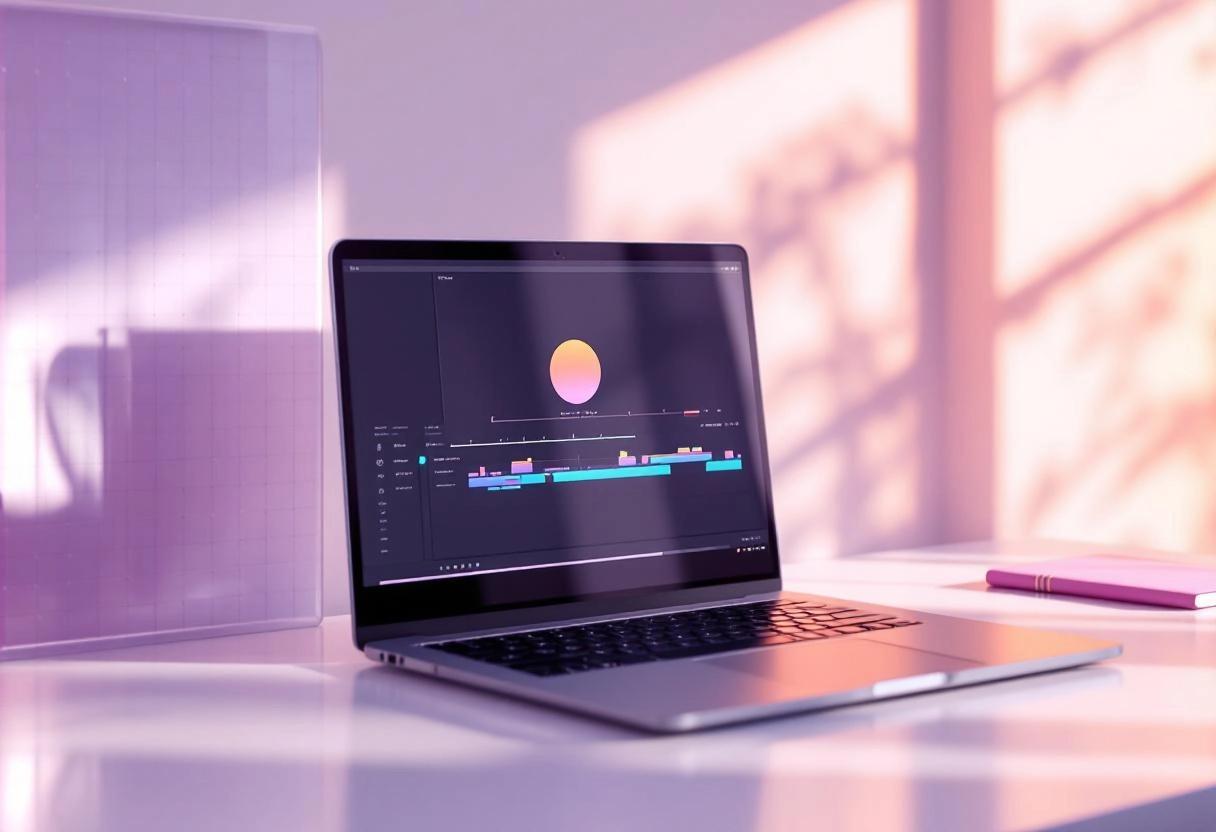
If you’re on your laptop or desktop, online video tools let you reverse clips without needing any software download. Here’s how:
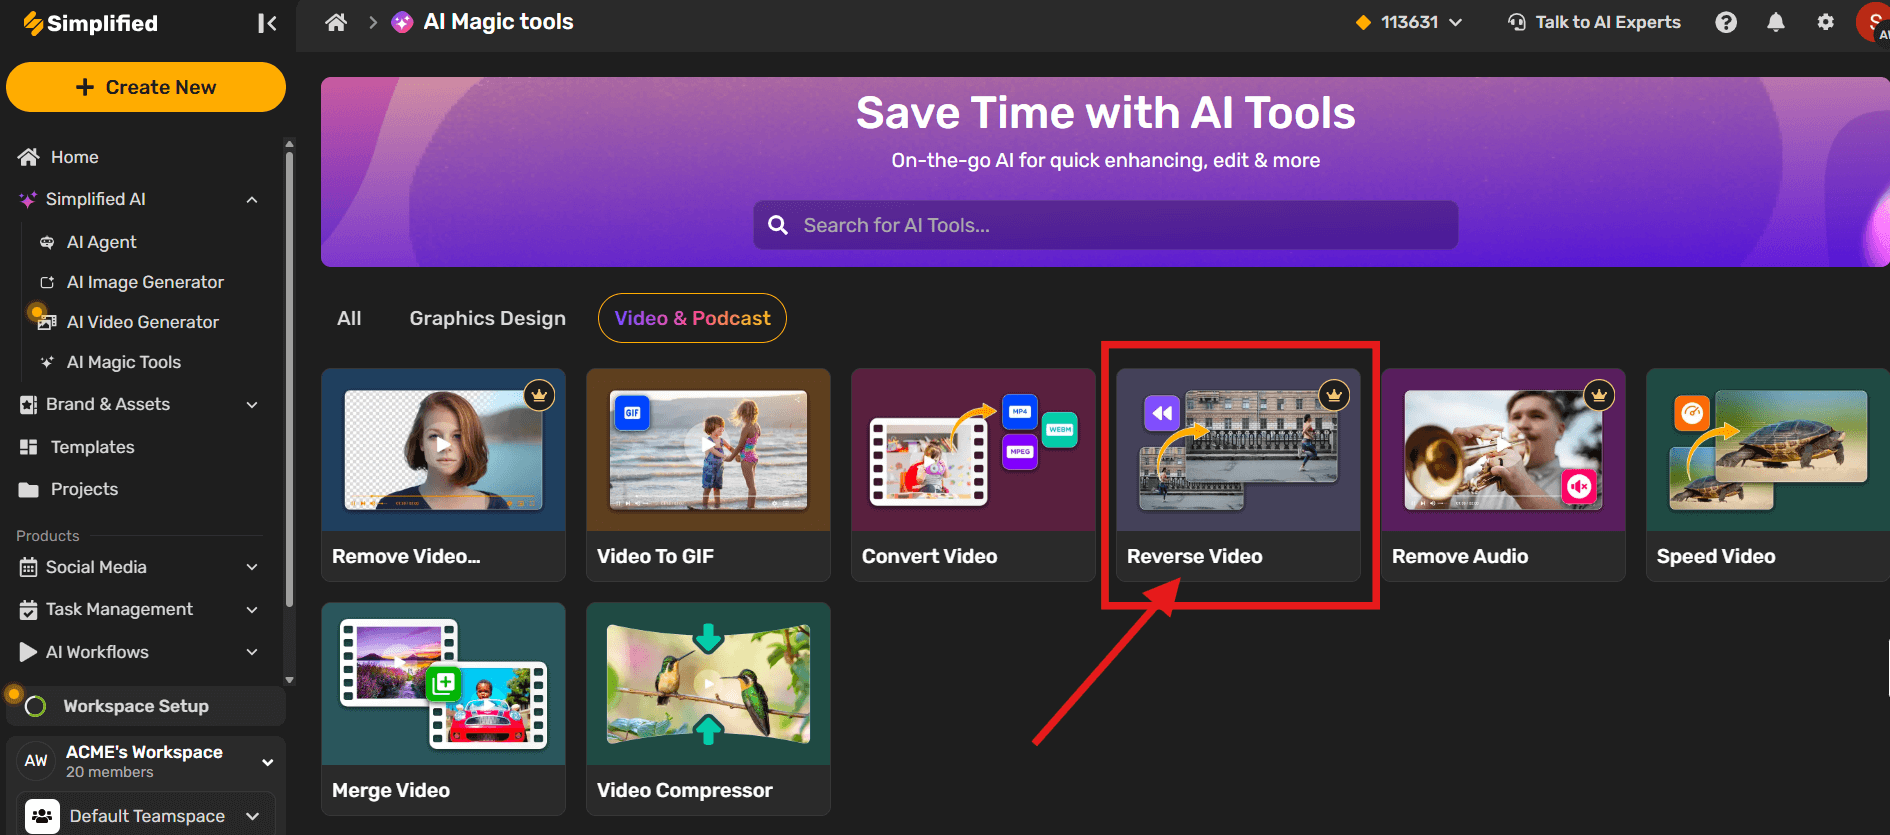
Step 1: Log In and Open the Reverse Tool
After logging into your account, go to AI Magic Tools. Click Video & Podcast, then choose Reverse Video from the menu.
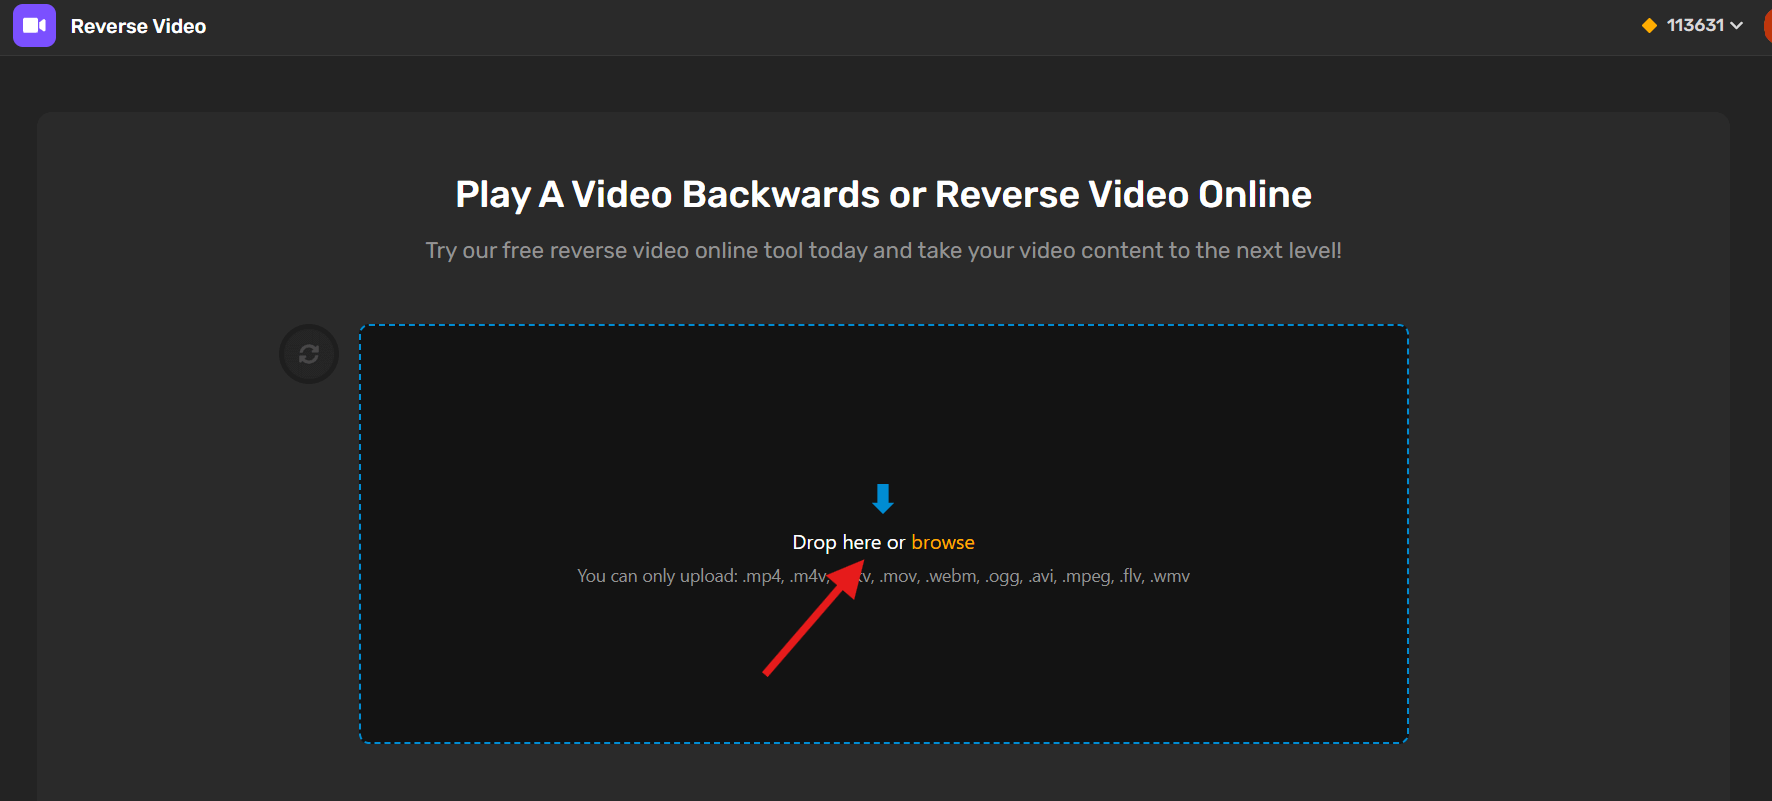
Step 2: Upload Your Video
Click the upload option and select the video/clip you want to reverse.
Here is the example video i have uploaded to test the tool:
Supported formats include .mp4, .mov, .mkv, .webm, and others. Once selected, the system will start processing it automatically.
Step 3: Click on “Open in Editor” or “Download” the Reversed Video
When the video is ready, you can preview it or simply download the reversed version directly. It’ll be ready to post anywhere—from Reels to YouTube Shorts.
or if you want to edit some more extra thing in the video you can click on “Open in Editor” and update it accordingly.
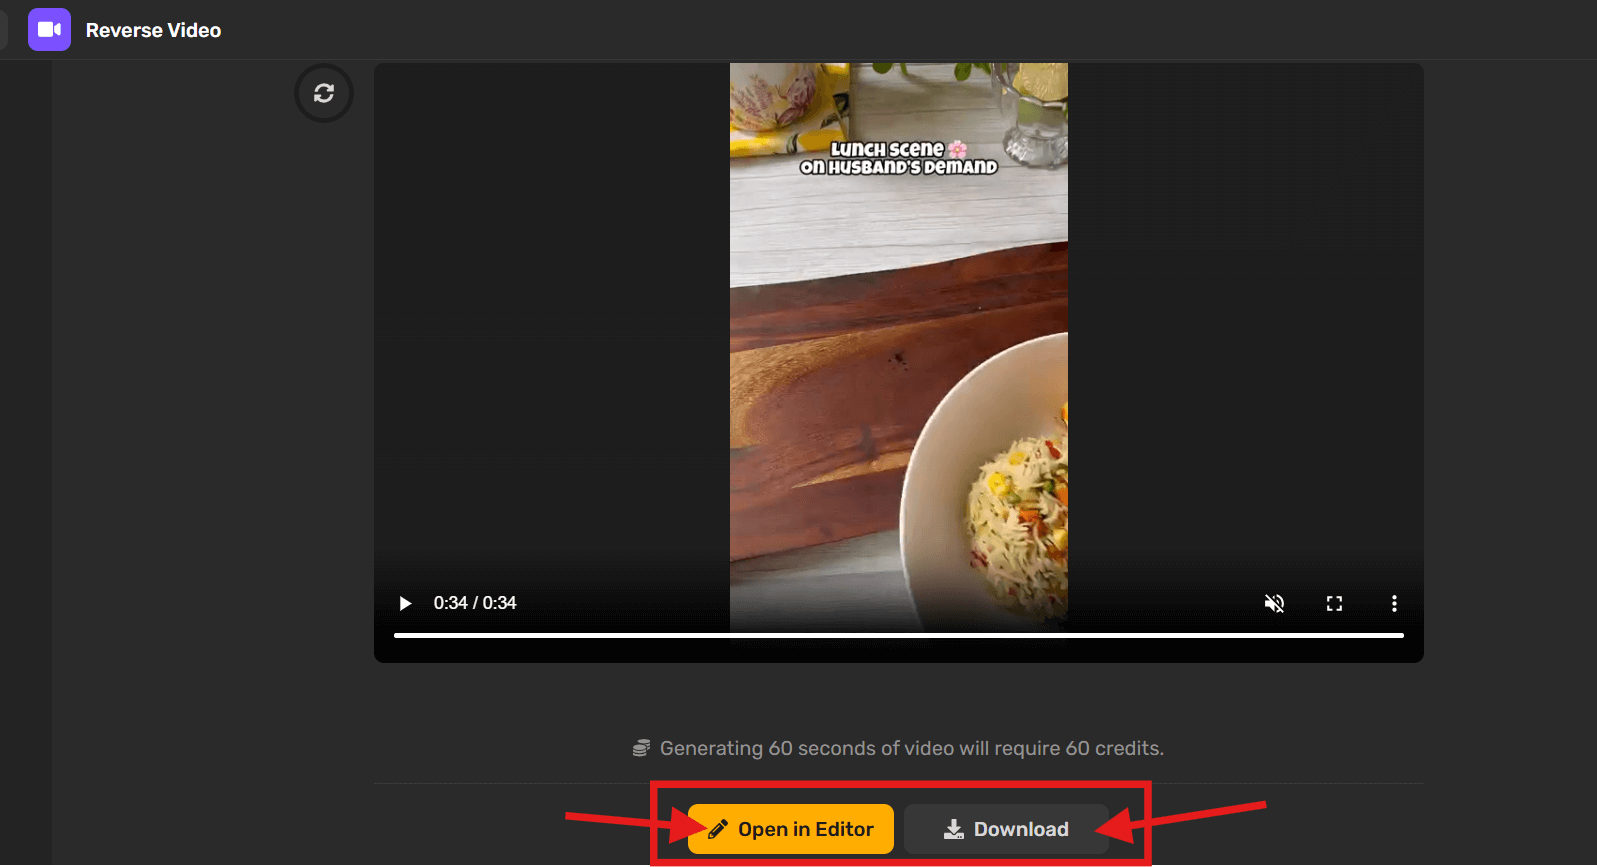
Here you can check the output result provided by reverse video tool
Tools You Can Use to Reverse Videos
If you’re looking to reverse videos, there are tools for both browser and phone users—some completely free, others with more editing features for a price. Here’s a quick list to help you choose based on what device you’re on:
1. Simplified (Browser & Mobile – Free)
Simplified is great for quick video edits without downloading anything. Just head to the AI Magic Tools, pick Reverse Video, upload your clip, and you’re good to go. You can also edit the clip further if needed before downloading it.
2. CapCut (Mobile – Free)
Available on both iOS and Android, CapCut lets you reverse videos with just a few taps. It’s especially useful when you’re editing right before posting to TikTok or Instagram.
3. Adobe Premiere Pro (Desktop – Paid)
If you’re already using this for video editing, Adobe Premiere Pro includes a manual reverse feature under Speed/Duration settings. It’s a good option when you need more detailed editing control, like combining reverse with other video effects.
4. iMovie (iOS/Mac – Free)
For iPhone and Mac users, iMovie offers a reverse option through timeline edits. It takes a few extra steps compared to other apps, but the result is clean and works well for casual creators.
5. Clideo (Browser – Free + Paid)
You can upload your clip directly to Clideo’s Reverse Video tool. The free version adds a watermark, but the paid option removes it and unlocks higher-quality downloads.
Content Ideas That Shine in Reverse
You know, there’s something oddly captivating about watching things unfold backward. It’s like peeking behind the curtain or seeing a story told in reverse. When it comes to creating content, flipping the ordinary upside down can really make your work stand out. I believe the trick lies in choosing ideas that naturally invite curiosity—things that feel familiar but get a whole new life when reversed. Let’s dive into some concepts that just can’t help but shine when played backward.
Magic Tricks and Illusions
Magic always has that edge of mystery, right? Now, imagine watching a card appear from seemingly thin air or a coin that vanishes—except in reverse. In my experience, reversing magic tricks isn’t just entertaining; it’s enlightening. When you rewind a vanish, it suddenly feels like a reveal, almost like a secret is spilling out to you.
One time, I saw a video where someone reversed a classic “disappearing ink” trick, and instead of ink disappearing, it magically formed a detailed pattern on paper. That feeling of “Wait, how’d that happen?” is a magnetic hook for viewers. Plus, illusions in reverse can encourage people to replay the clip, trying to unravel the mechanics hidden in that backward motion. This kind of content naturally invites engagement and sparks conversation—a win-win if you ask me.
Everyday Actions with a Surprising Twist
Alright, let’s get a bit more down-to-earth here. Ever noticed how the mundane—pouring coffee, peeling a fruit, or throwing a paper plane—feels totally new when reversed? This is exactly where creative content takes an unexpected turn. For example, watching spilled water leap back into a glass or a crumpled piece of paper unfold into perfect flatness isn’t just oddly satisfying, it actually makes you pause.
In my own experiments, filming a seed growing into a sprout and reversing it gave a curious effect of a plant seemingly retracting back into the earth like a sleepy animal curling up for a nap. It adds a touch of wonder to otherwise common moments. And honestly, sometimes we all need a little reminder that ordinary things can become extraordinary with just a little shift in perspective.
Creative Visual Effects and Transitions
Here’s where things get a bit techy but in a fun way. Using visual effects and clever transitions in reverse can add that crisp, eye-catching polish your content needs. Think about a montage where shattered glass seems to reassemble itself piece by piece, or a sunset rewinds into a sunrise with colors swirling opposite to what you’d expect. It’s like watching a visual story unfold in a manner that defies reality but feels oddly poetic.
Actually, let me rephrase that—this kind of editing plays with our brain’s pattern recognition and subtly messes with time, making viewers linger longer. I tried using a reversed transition once, where a bike tire skid marks pulled back up as if erased from the pavement, and people kept asking me how I did it. The trick isn’t just the effect itself, but how it makes you rethink the flow of time and action.
So if you’re pondering your next twisty piece of content, consider the power of reversal through effects. It’s like adding a secret ingredient that spices up a recipe everyone thought they knew.
Honestly, the beauty of reverse content is less about the gimmick and more about the fresh lens it offers. It tickles our curiosity and plays with expectations, turning the familiar into a little visual mystery we just can’t look away from. And isn’t that what great content should do?
Tips for Making Your Reverse Videos Look Professional
So, you’ve got your reverse video all ready, but how do you make it look like it wasn’t just slapped together on a whim? Honestly, a few little changes can make a huge difference in making your reverse vids look crisp and polished. I’ve spent way too many late nights tweaking transitions and soundtracks just to get that smooth feeling. Let me share what I’ve learned.
Ensuring Smooth Transitions and Seamless Loops
This part is, to me, the heartbeat of a good reverse video. Nothing kills the vibe faster than a jarring cut or a glitch where the clip loops back to the start. I’ve noticed that paying special attention to how your clip begins and ends really makes or breaks the flow.
Here’s a little hack: try to pick clips where the ending frame visually matches the starting frame or at least flows naturally. If you’re dealing with something like water splashing or a spinning object, that natural flow helps the eye relax. On the other hand, if your clip ends mid-motion and then jumps back to the start, it feels… well, kinda like a hiccup.
When I’m editing, I usually trim a few frames off the tail or head to align them better. Also, using crossfades or brief opacity fades at the start and end can smooth things out subtly without anyone noticing the trickery. And if you’re looping the video, preview it several times—sometimes that sinking feeling creeps in just at the fifth or sixth loop.
Adding Music and Sound Effects for Impact
Have you ever watched a reverse clip without sound and thought, “Meh, it’s kinda missing something”? Music and sound effects are the secret sauce—well, actually, scratch that, they’re the entire flavor profile. Seriously, a good soundtrack can elevate even a simple reverse spin into a mini emotional journey.
When I’m choosing music, I gravitate towards tracks with a steady beat or something whimsical if the clip has a playful vibe. Funny enough, sometimes the music’s rhythm guides how I trim the clip. Like, I’ll cut right on a beat drop or a lyric that fits the action.
And sound effects? Oh, they’re priceless. Like reversing a pouring liquid sound or a reversing ‘whoosh’ to match a fast rewind—those little touches make the work feel intentional rather than accidental. Just be careful not to go overboard; the sound should support the visuals, not compete with them.
Optimizing Your Video for Each Platform (Reels, Shorts, TikTok)
You might think, “Hey, one video fits all platforms, right?” Actually, nope. Each platform has its quirks—kind of like how Instagram Reels and TikTok are distant cousins with different tastes.
For example, Instagram Reels often favors a clean, vertical 9:16 format, with quick hooks in the first 3 seconds to grab attention. TikTok, meanwhile, thrives on playful, fast-paced content that feels authentic—even if it’s a bit rough around the edges. YouTube Shorts also likes vertical videos but tends to reward slightly longer clips (around 15-30 seconds) that loop smoothly.
So, what’s the takeaway? Tailor your clip’s length and crop with the platform in mind. Sometimes that means re-editing the same video to perfectly fit each app’s vibe rather than just tossing the same file everywhere. Also, captions and stickers work differently across them—adding a little personality can boost engagement.
Honestly, I’ve wasted hours posting the “perfect” video on TikTok only to realize I didn’t adjust the text placement and parts got cut off. Trust me, do a quick preview on each platform—nothing worse than your carefully crafted message disappearing behind buttons or scores.
At the end of the day, making your reverse videos look professional isn’t rocket science—it’s about paying attention to these details and being willing to experiment. And yeah, sometimes you just gotta trust your gut and post it anyway because perfectionism can be a trap.
Final Thoughts
Reversing videos is a quick way to add something interesting to your content. Whether it’s for a funny moment, a rewind effect, or just to stand out on someone’s feed, it works well across TikTok, Reels, and YouTube Shorts.
It doesn’t take much—just a few clicks, and you’re ready to post. Try it out on your next video and see how people respond. Sometimes, the simplest edits can leave the biggest impression.


")


