Are you a budding Video Editor or Content Creator? Well, are you caught up in the maze of all the information available online? You have come to the right place.
Video editing is an art that allows you to tell compelling stories, and one technique that can add an extra layer of visual appeal and narrative depth to your videos is the Ken Burns Effect.
Confused? Worry not. We’ve got the answer to your query: What is the Ken Burns Effect?

Named after the renowned documentary filmmaker Ken Burns, this technique involves zooming and panning across images to create the illusion of motion and bring static pictures to life.
In this beginner’s guide, we will walk you through using the Ken Burns Effect to enhance your video projects, providing step-by-step instructions, practical tips, and valuable insights.
But, before that: here’s a little history.
Who is Ken Burns?
Ken Burns is an American documentary filmmaker and producer best known for his distinctive style of using archival photographs, historical footage, and interviews to create compelling and often epic-length documentaries. He was born on July 29, 1953, in Brooklyn, New York.
Ken Burns Teaches Documentary Filmmaking | Official Trailer | MasterClass
Ken Burns is renowned for his ability to bring history to life through storytelling. He is known for using the “Ken Burns Effect,” a technique that involves zooming and panning across still images to give them a sense of motion. This effect has become a signature element in many of his documentaries.
Some of Ken Burns’ most notable works include:
The Civil War (1990), Baseball (1994), Jazz (2001), The National Parks: America’s Best Idea (2009), The Vietnam War (2017).
Ken Burns’ documentaries are often praised for their detailed research, emotional depth, and ability to engage audiences with complex historical narratives. His storytelling has left a significant impact on documentary filmmaking and has inspired countless filmmakers and storytellers.
What is the Ken Burns effect?
The Ken Burns Effect is all about adding a touch of cinematic magic to your static images. It creates the illusion of motion by slowly zooming in or out and panning across an image, giving the impression that the camera is moving within the frame.

This technique can transform simple images into dynamic visual narratives, making them more engaging and captivating for viewers.
How does the Ken Burns Effect work?
So, How can you bring life to a picture or still photograph? Well, here’s how the Ken Burns effect works:
Zooming In/Out
The effect starts by zooming in or out on a specific area of the image. This zoom creates the impression of the camera moving closer to or farther away from the subject, revealing details that might not be immediately visible in the original image.

Panning
Alongside zooming, the image also pans horizontally or vertically across the frame. This movement gives the viewer the sense that the camera is moving within the image, exploring different areas or perspectives.
Keyframes
To achieve the Ken Burns Effect, video editing software allows you to set keyframes, which are specific points in time where the zoom and pan values are defined. By setting multiple keyframes, you can create a smooth and controlled motion effect.
Timing and Speed
The speed at which the zoom and pan occur can vary. You can have slow and gradual movements or quicker, more dramatic motions. The timing and speed choices influence the mood and impact of the effect on the viewer.

The Ken Burns Effect is commonly used in documentaries, presentations, slideshows, and other video projects where still images need to be brought to life. It adds a dynamic quality to visuals, making them more engaging and visually appealing. For example, in a historical documentary, you could use the Ken Burns Effect to focus on specific details within a historical photograph, making the past come alive for viewers.
Many video editing software tools have built-in features that allow users to easily apply the Ken Burns Effect to their images without needing advanced animation skills. It has made the technique accessible to both professionals and beginners in the field of video editing.
Bonus: How To Edit Videos on iMovie: A Detailed Guide For Beginners
Step-by-Step Guide to Using the Ken Burns Effect
Step 1: Choose Your Media
Start by selecting the image or video clip you want to enhance with the Ken Burns Effect. Choose high-resolution and visually interesting media, as the effect works best when there are details to highlight through zooming and panning.

Step 2: Select Your Video Editing Software
Various video editing software options are available, ranging from beginner-friendly to advanced. For newcomers to video editing, user-friendly software like Simplified, Adobe Premiere Elements, iMovie, or Filmora can be great choices. These platforms offer simple interfaces and tools to help you implement the Ken Burns Effect seamlessly.
Step 3: Import Your Media
Import your chosen media into the video editing software. Most software options allow you to drag and drop your files into the project timeline.

Step 4: Add the Ken Burns Effect
Locate the Ken Burns Effect tool or option in your video editing software. It might be referred to as “Pan and Zoom,” “Motion,” or something similar. Apply the effect to the media item on your timeline.

Step 5: Set Keyframes
The Ken Burns Effect involves creating keyframes to specify the start and end points of the zoom and pan motion. Set your initial keyframe at the beginning of the clip, then set additional keyframes for the desired changes in zoom and position.

Step 6: Adjust Timing and Movement
Determine the timing of the effect—how long it takes for the zoom and pan motion to occur. Experiment with different durations to find the right balance. Additionally, adjust the speed of the zoom and pan to achieve the desired visual effect.
Step 7: Preview and Refine
Always preview your video to see how the Ken Burns Effect looks. Make any necessary adjustments to keyframes, timing, or movement to ensure the effect flows smoothly and enhances the visual storytelling.
Step 8: Export Your Project
Once you are satisfied with the result, export your edited video. Choose the appropriate settings based on where you plan to share or showcase your video—whether it’s on social media, a website, or a presentation.
And, Viola! Your image has come to life.

Practical Tips for Using the Ken Burns Effect
- Start Slow: Especially for beginners, it’s a good idea to begin with subtle zoom and pan movements. Over time, as you become more comfortable, you can experiment with more dynamic effects.
- Consistency is Key: If you’re applying the Ken Burns Effect to multiple clips within a single video, aim for consistency in terms of movement speed and style. It creates a cohesive viewing experience.
- Storyboarding: Plan your zoom and pan movements ahead of time by sketching a rough storyboard. It will help you visualize how the effect will enhance your story.
- Emphasize Storytelling: The Ken Burns Effect is not just about adding motion; it’s about enhancing the story you’re telling. Use the effect to draw attention to important details or emphasize emotions within the visual content.
Bonus: 6 Simple Steps To Quickly Crop and Resize Your Videos For TikTok
Simplified: Your Companion for Effortless Ken Burns Effects
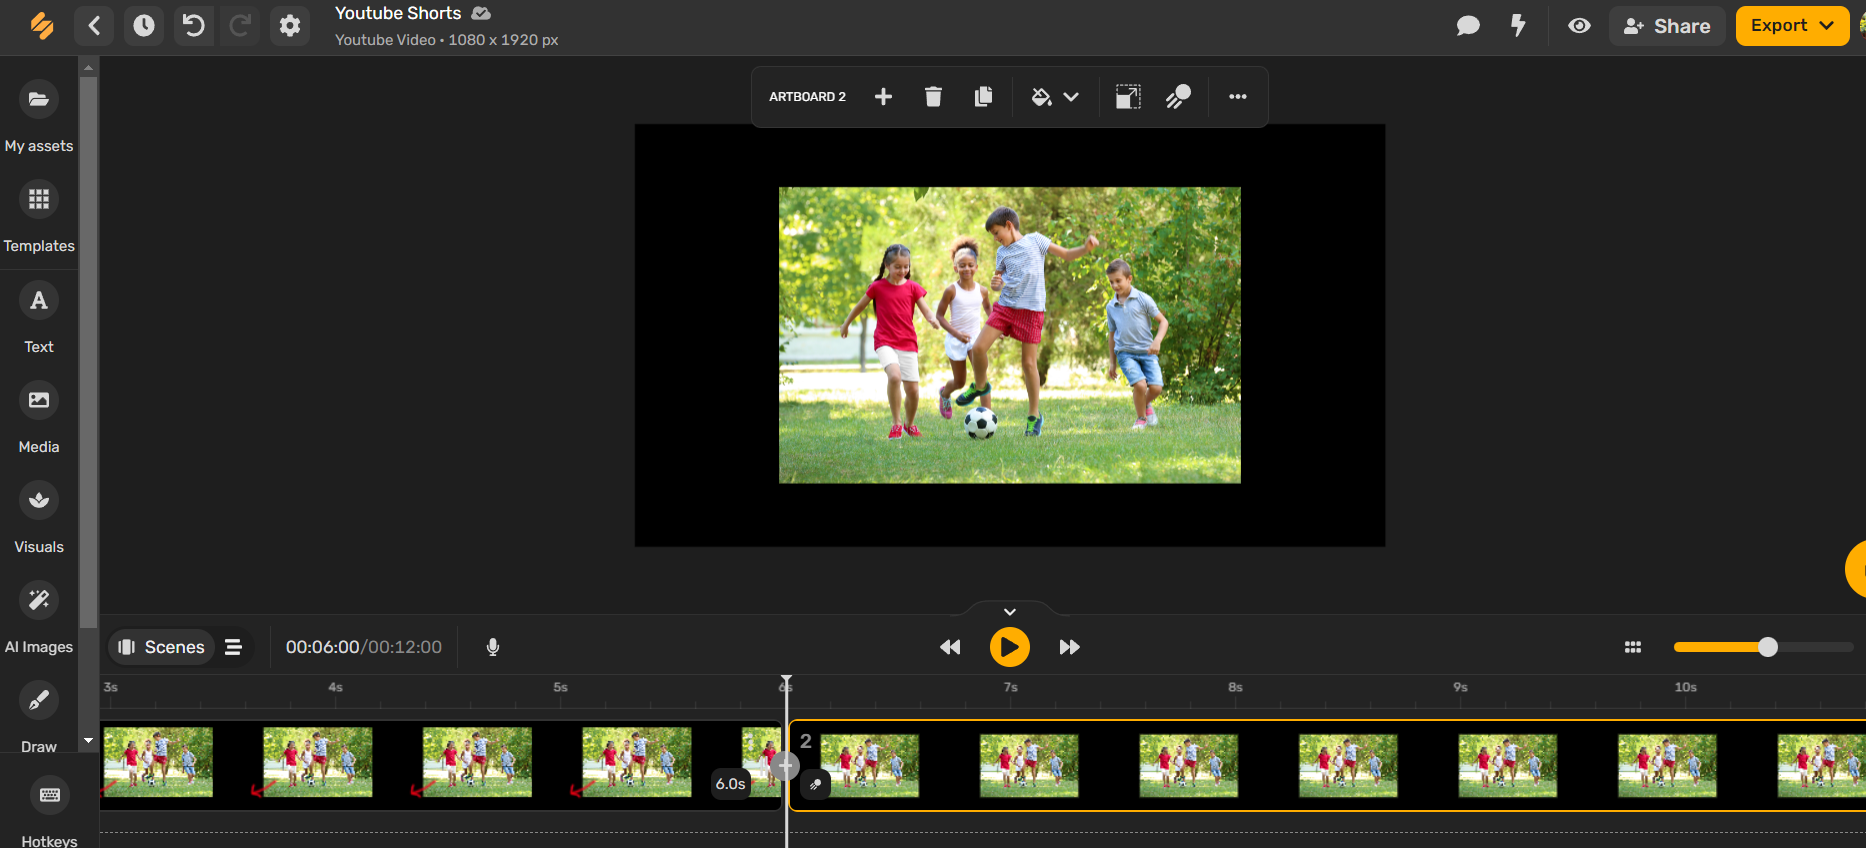
Simplified is an AI-powered video editing platform designed with simplicity and creativity. It offers users, especially beginners, the opportunity to enhance their videos with professional-level effects without requiring a steep learning curve.
One of the standout features of Simplified is its ability to effortlessly implement the Ken Burns Effect, turning static images into captivating visual stories.

Simplified takes the complexity out of the Ken Burns Effect, allowing beginners to explore creative video editing without feeling overwhelmed. By providing an intuitive interface, automated tools, 1000s of built-in templates, and real-time previews, Simplified helps you to create visually captivating videos that stand out.
Bottomline
So, this guide answers your burning question, “What is the Ken Burns Effect?” The Ken Burns Effect is a fantastic tool for adding visual flair and storytelling depth to your videos. With the right approach and the assistance of tools like Simplified, even beginners can master this technique and create stunning visuals that captivate their audience. So go ahead, explore the world of the Ken Burns Effect, and let your creativity shine.


![How to Make Alex Hormozi Style Captions & Subtitles [Tips & Tools] How to Make Alex Hormozi Style Captions & Subtitles [Tips & Tools]](https://siteimages.simplified.com/blog/how_to_make_alex_hormozi_style_captions___subtitles-02-scaled.jpg?auto=compress&fit=crop&fm=pjpg&h=400&w=400)


