
|
Getting your Trinity Audio player ready...
|
Screenshots are an essential tool that lets you capture and share information with ease. However, simply taking a screenshot is often not enough. You need to know how to edit a screenshot on Mac by adding annotations, cropping out unnecessary elements, or highlighting important information.
Whether you’re a content creator, educator, or simply someone who frequently uses screenshots, learning how to edit screenshots like a pro can save you time and improve the quality of your work.
In this article, we’ll show you how to edit a screenshot on Mac using the built-in Preview app and a third-party editing software, Simplified’s graphic design tool.
Let’s dive in.
Bonus: Creating A Global Preview Link For Anyone To Duplicate Design
Why It is Important to Edit Screenshots
Editing a screenshot allows you to crop out unwanted parts of the screenshot and add annotations to better explain the most important parts of the screenshot.
Plus, we are in a digital age where information quickly becomes obsolete. Editing a screenshot allows you to update essential information without taking another screenshot.
Bonus: Nonprofit Graphic Design: How To Make an Impact
Editing Screenshots on Mac: Expert Tips and Tricks
The expert tips and tricks below can help you achieve professional-looking results in your screenshot editing tasks:
1. Simplify the Process with the Right Tool
Leveraging an advanced editing tool such as Simplified’s graphic design tool can make it a lot easier to edit screenshots on your Mac OS. With Simplified’s intuitive interface and AI-powered functionalities, you to add annotations, crop images, add text and branding elements, and perform a range of other editing functions quickly and easily.
2. Utilize Keyboard Shortcuts to Edit Faster
Mac offers a range of keyboard shortcuts that can help you speed up the editing process. You can use keyboard shortcuts to capture the entire Mac screen, a window, or a portion of the screen (more about that later).
3. Get Creative with Filters and Effects
Adding filters and effects to your screenshots can make them stand out and look more creative. Graphic design editing apps have a range of filters and effects; experiment with them to find the ones that work best for your project.
4. Use Shapes and Arrows to Draw Attention
Shapes and arrows are some of the best annotations for drawing viewers’ attention to important elements on the screenshot and making them engaging. The right screenshot editing tools for Mac OS let you add shapes and arrows with ease.
5. Save Time with Automation Tools
If you find yourself editing screenshots regularly, consider using automation tools to save time. Automating workflows will automatically save your edited screenshots to a specific folder or convert them to a different file format.
Bonus: 20+ Best AI Video Editors for Professional-Quality Editing [Free & Paid]
How to Capture a Screenshot on Mac
Whether you want to capture the entire screen, a portion of the screen, or a window on your Mac, the steps below show you how to capture screenshots on a Mac OS:
How to Capture Your Entire Mac Screen

Source: Apple
By pressing and holding the “Shift, Command, and 3” keys together, you will capture the entire screen of your Mac. Once captured, a thumbnail appears which you can edit or just wait for it to save to your device automatically.
How to Capture a Selected Area of Your Screen

Source: Apple
Press and hold the “Shift, Command, and 4” keys together, then drag the crosshair over the area of the screen you want to capture. You can adjust the selected area by pressing and holding the “Space bar” while dragging the crosshair. You can also cancel the process by pressing the “Esc” key.
Once you have selected the area you want to capture, release the mouse or trackpad button to take the screenshot. An editable thumbnail appears at the corner of your screen and saves to your device automatically.
How to Capture a Window

Source: Apple
Open the window you want to capture and press and hold the “Shift, Command, 4, and Space bar” keys together. A camera icon appears; use the icon to click the window and it will capture it.
If you want to capture the window without its shadow, press and hold the “Option” key before clicking to capture. Once the window is captured, you’ll see an editable thumbnail at the corner of the screen. Wait for it to save to your device automatically.
Bonus: 10 Must-Have Generative Fill Tools for Stunning Graphic Designs
How to Edit a Screenshot on Mac in 2 Easy Ways
This section shows you how to edit a screenshot on a Mac using the Preview software and the robust Simplified Graphic Design tool. Let’s go through the steps:
Method 1: Edit a Screenshot with Preview on Mac
Preview is a built-in app on Mac used for viewing and editing multiple file formats with ease.
Here’s how to edit a screenshot on Mac using Preview:
Step 1: Open Preview on your Mac and select the screenshot you want to edit.
Step 2: Click on the “Show Markup Toolbar” option at the top-right corner of the screen. This opens a drop-down menu displaying all the editing tools.
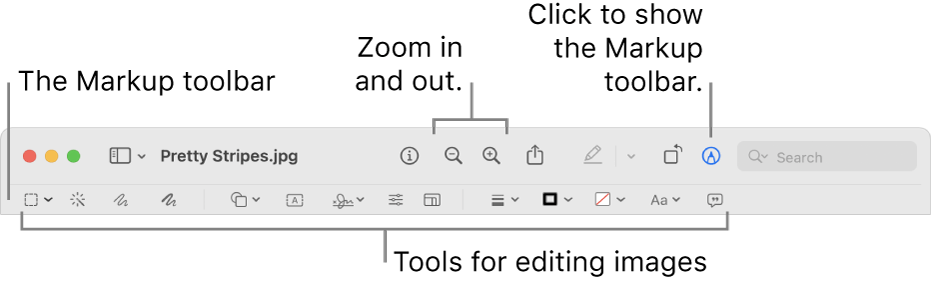
Source: Apple
You can use differently shaped selection tools: remove backgrounds with Instant Alpha, use sketching tools, draw shapes, and add text or signatures to your screenshot.
Step 3: Once you’re done editing, click the “File” tab and select “Save” to save your edited screenshot.
While Preview is an efficient tool for basic editing, it can’t save images in different formats or create GIFs. These are huge drawbacks for a screenshot editing tool like Preview.
Bonus: The Ultimate Guide to Crafting a Perfect Graphic Design Resume + Examples
Method 2: Edit a Screenshot with Simplified’s Graphic Design Tool
Simplified is a dedicated tool with advanced editing features for modifying and enhancing screenshots and images.
Beginner editors looking for how to crop a screenshot on Mac will find this tool to be indispensable for cropping their screenshots. Plus, you can use Simplified to turn your screenshot into a GIF or simply save it in any format of your choice.
Here are some of the best features of Simplified:
- Simple and easy-to-navigate interface
- AI-powered functionalities, such as instant AI art generation
- An all-in-one creative suite with AI-powered tools for writing, graphic design, and video editing
- Integrates with social media platforms and other workflow applications
- Allows teams to collaborate on different design projects
Here’s how to edit a screenshot on Mac using Simplified’s graphic design tool:
Step 1: Go to the Simplified graphic design tool and click/tap the “+” icon to edit a screenshot in a project tab.

Source: Simplified
Step 2: Start a new project by inputting the project name and dimensions. You can choose to use one of the available templates that aligns with the screenshot you intend to edit.

Source: Simplified
Step 3: Drag-and-drop or import your screenshot.

Source: Simplified
Step 3: Perform different editing functions, such as adding annotations, cropping, adding text, adding branding elements, etc.

Source: Simplified
Step 4: Click/tap the “Export” button the top-right corner to choose the quality and format for your edited screenshot; then download it for free.

Source: Simplified
Simplified’s graphic design tool can make your screenshots look more professional. With its user-friendly platform and advanced editing features, you can enhance your graphic design skills and take your screenshot editing to the next level.
Bonus: Skyrocket Engagement with the Simplified Graphic Design Templates
It’s almost impossible to see a professional individual or brand not taking advantage of social media for their professional service or business success.
From Facebook posts and Instagram Stories to Pinterest posts and Shopify homepage banner, Simplified graphic design templates are available for all industries across all social networking sites.
You can customize these free graphic design templates to meet your needs and use them to boost your your audience engagement and how they interact with your offers.
Here are a few templates you can use:
Online Christmas Promotions (Facebook Post)

Online Webinar (Instagram Story)

Holi Wish (Instagram Post)

Super Bowl Tacos (Pinterest Post)

Grow Business (Twitter Post)

Akash Classes (LINKEDIN POST)

News And Analysis (YouTube Thumbnail)

Doctor’s Day (WhatsApp Status)

Where are you? Suspense Ebook (eBook Cover)

Trust The Experts (Shopify Home Page Desktop Banner)

Wrapping Up
Now that you have an in-depth understanding of how to edit a screenshot on Mac using the Preview app and Simplified AI editing tool, you can start editing your screenshots for a more professional look.
But if you want to truly stand out from the crowd and beat your competitors, you should consider using the Simplified AI-powered graphic design tool.


![10 Best AI Sticker Generator Tools for Seamless Graphic Design [Free & Paid]](https://siteimages.simplified.com/blog/Must-Try-AI-Sticker-Generator-Tools-02.png?auto=compress&fit=crop&fm=png&h=400&w=400 "10 Best AI Sticker Generator Tools for Seamless Graphic Design [Free & Paid]")


![10 Best AI Image Restoration Tools to Try in 2025 [Free & Paid]](https://siteimages.simplified.com/blog/Best-AI-Image-Restoration-Tools-01.png?auto=compress&fit=crop&fm=png&h=400&w=400 "10 Best AI Image Restoration Tools to Try in 2025 [Free & Paid]")
![How to Use Photoshop AI Generative Fill Feature [2025]](https://siteimages.simplified.com/blog/How-to-Use-Photoshop-AI-Generative-Fill-01-1.png?auto=compress&fit=crop&fm=png&h=400&w=400 "How to Use Photoshop AI Generative Fill Feature [2025]")
![20 Podcast Thumbnail Ideas to Boost Your Show’s Visual Appeal + Best Practices [2025]](https://siteimages.simplified.com/blog/Podcast-Thumbnail-Ideas-to-Boost-Your-Show-02-1.png?auto=compress&fit=crop&fm=png&h=400&w=400 "20 Podcast Thumbnail Ideas to Boost Your Show’s Visual Appeal + Best Practices [2025]")


